
Short answer: give an AI agent such as Claude Code SSH access to your old cPanel server and your new server, keep it in manual approval mode, and let it run four commands for you: pkgacct to back up the cPanel account, rsync to copy the archive, virtualmin migrate-domain to import it, and a set of checks before you switch DNS. We ran exactly this on two real servers. The website, database, both mailboxes (with their old passwords and mail), the forwarder and the cron job all arrived, with no control panel screens and no data typed by hand.
What we tested
- Old server: cPanel & WHM 138 on AlmaLinux 9, with one account for a demo shop: a PHP page that reads a MariaDB database, two mailboxes with one real email waiting, a forwarder and a cron job.
- New server: a fresh AlmaLinux 9 VPS with Virtualmin (GPL edition) and its LAMP bundle.
- The agent: Claude Code on our own computer, with SSH access to both servers. It ran every command; we approved each change.
The domain in this guide is example.org and the servers are called old-server and new-server; we replaced real addresses with placeholders. The commands and output in the screenshots are real.
Before you start
- Root SSH access to both servers. On the old server you need root to run cPanel’s backup script.
- A fresh new server on a system Virtualmin fully supports: AlmaLinux, Rocky or RHEL 8 to 10, Debian 12 or 13, or Ubuntu 24.04 or 26.04, according to Virtualmin. Do not install it on a server that already hosts sites.
- Free disk space. cPanel recommends free space greater than twice the size of the largest account, plus 1 GB, for its backup script.
- Lower the DNS TTL of the domain to 300 seconds a day before, so the switch at the end takes effect quickly.
- Start the agent in manual approval mode. Recent versions of Claude Code start in auto mode, where a second model approves actions for you. For production servers, start it with
claude --permission-mode manualso it stops and asks before every command that changes something.
Step 1: Tell the agent what you want
Open a terminal where you can already reach both servers with ssh, start Claude Code, and describe the whole job in plain words. A prompt like this works well:
I want to move the cPanel account "shopdemo" (domain example.org) from old-server
to new-server and run it on Virtualmin. Both are reachable as root over ssh.
1. Check new-server is ready for Virtualmin and install it with the LAMP bundle.
2. On old-server, list what the account has, then back it up with cPanel's pkgacct.
3. Copy the backup to new-server with a temporary SSH key and check its checksum.
4. Import it with virtualmin migrate-domain.
5. Prove everything arrived: database checksum, website, mailboxes, forwarders, cron.
Explain each step and show me every command before you run it.
Never print passwords; keep them in root-only files.
The agent turns that into a plan and works through it with you. The steps below are what it ran in our test.
Step 2: Install Virtualmin on the new server
Virtualmin’s official installer sets up Apache, PHP, MariaDB, Postfix, Dovecot, BIND and Webmin in one go. Give the server its own host name that is not one of the domains you will host:
curl -fsSL -o virtualmin-install.sh https://software.virtualmin.com/gpl/scripts/virtualmin-install.sh
sh virtualmin-install.sh --bundle LAMP --hostname vmdst.example.com --force
It took about 17 minutes on a 2 vCPU VPS and ended with “Installation Complete!”. Three things needed fixing in our test, and the agent caught each one by reading the output:
- DNS stopped resolving after the host name changed. The first install attempt failed with “Could not resolve host”. The VPS had no DNS servers set in NetworkManager, so changing the host name left
/etc/resolv.confwithout any. Setting resolvers on the connection fixed it:nmcli con mod "System eth0" ipv4.dns "1.1.1.1 8.8.8.8" ipv4.ignore-auto-dns yesfollowed bynmcli device reapply eth0(use your own connection name). Check withgetent hosts software.virtualmin.combefore you start. - Apache was not running after the installer finished.
systemctl start httpdstarted it. - Virus scanning was not running.
virtualmin check-configreported that the ClamAV daemon was not running.systemctl enable --now clamd@scanstarted it, and the check passed.
Step 3: Back up the account on the cPanel server
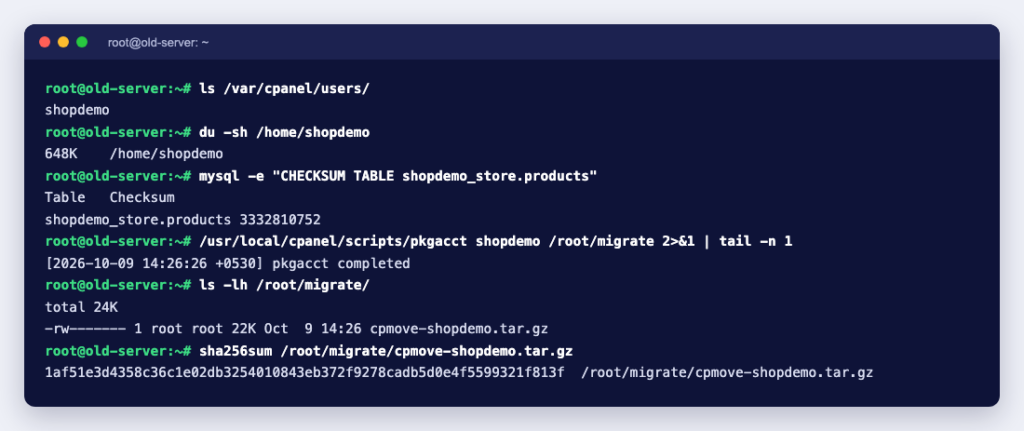
On the old server, the agent first lists what the account contains, records a checksum of the database table to compare later, and then runs cPanel’s own backup script. pkgacct writes the whole account (files, databases, mail, DNS zone, cron and settings) into one cpmove-USERNAME.tar.gz archive. It worked from the command line even though our test server had no active cPanel licence.
Step 4: Copy the backup with a temporary key
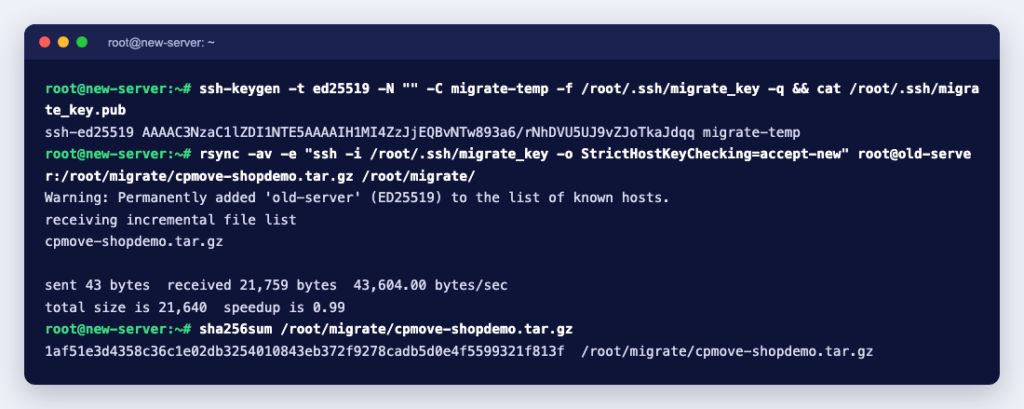
The new server pulls the archive directly from the old one. Instead of sharing a password, the agent creates an SSH key that exists only for this copy, adds its public half to the old server, copies the file with rsync and compares the SHA-256 checksum. Identical checksums mean the file arrived intact. On the old server, the key was added with:
echo 'ssh-ed25519 AAAA... migrate-temp' >> /root/.ssh/authorized_keysThen, on the new server:
Step 5: Import the account into Virtualmin
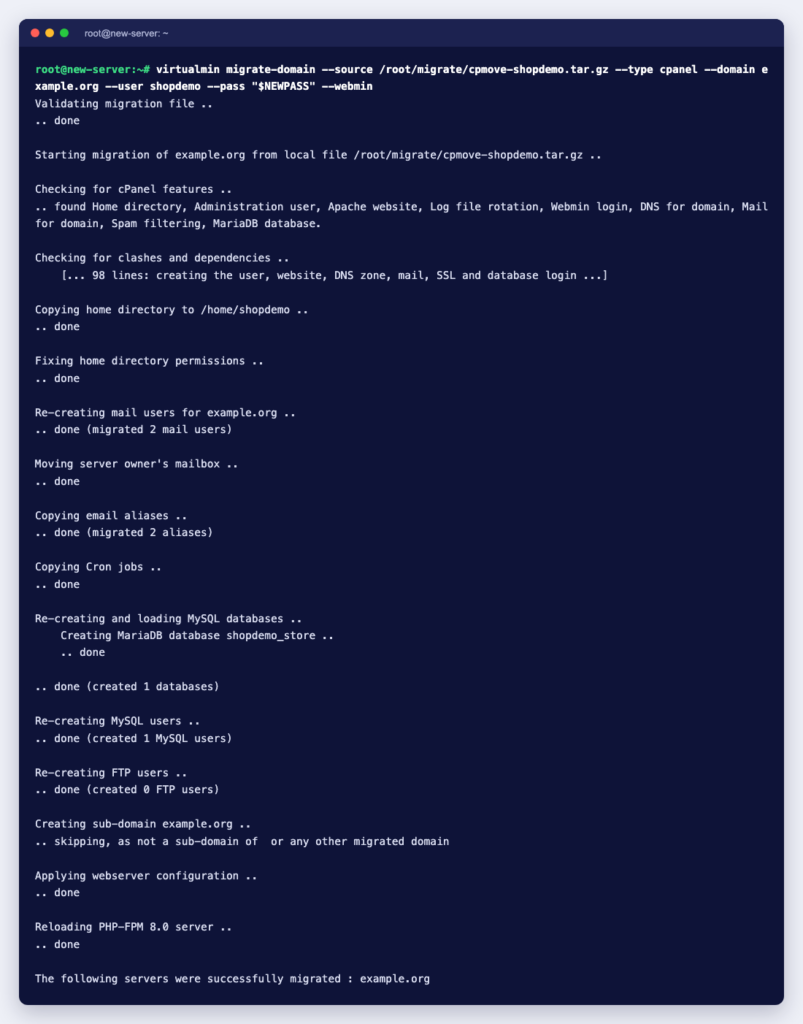
One command does the import. --pass is required for cPanel migrations; it becomes the account owner’s password on the new server, and the agent read it from a root-only file instead of printing it. --webmin creates a matching panel login.
virtualmin migrate-domain --source /root/migrate/cpmove-shopdemo.tar.gz \
  --type cpanel --domain example.org --user shopdemo --pass "$NEWPASS" --webmin
Virtualmin read the cPanel archive, found the website, DNS, mail, spam filtering and database, recreated them and reported “The following servers were successfully migrated”. It also turned on DKIM signing for the domain and added the DKIM record to its DNS zone. Two notes from our run: it could not set up CGI because the account had no cgi-bin folder (harmless if you do not use CGI), and it kept a self-signed SSL certificate, because a real one can only be issued after DNS points to the new server.
Step 6: Prove everything arrived
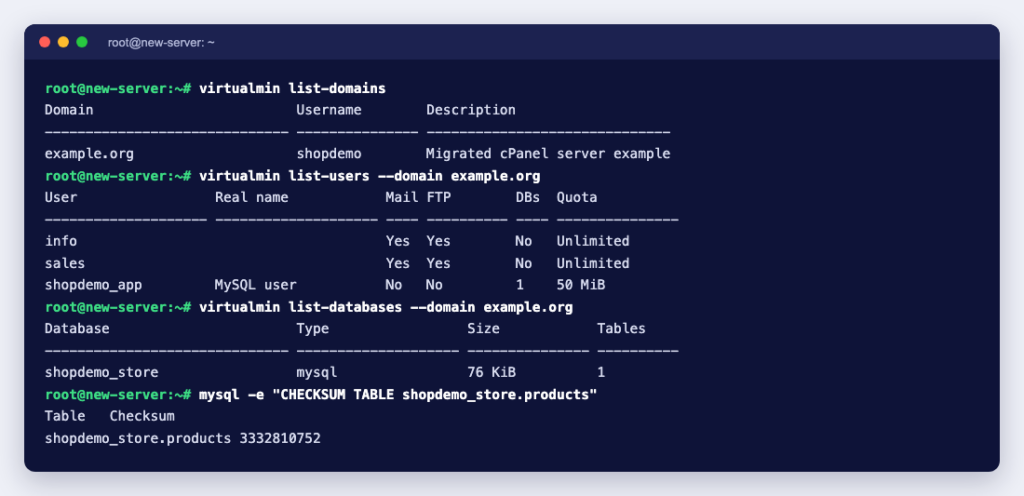
This is the step people skip when they migrate by hand, and the step an agent never gets bored of. First, the account, mailboxes, database user and database, plus the same table checksum as on the old server:
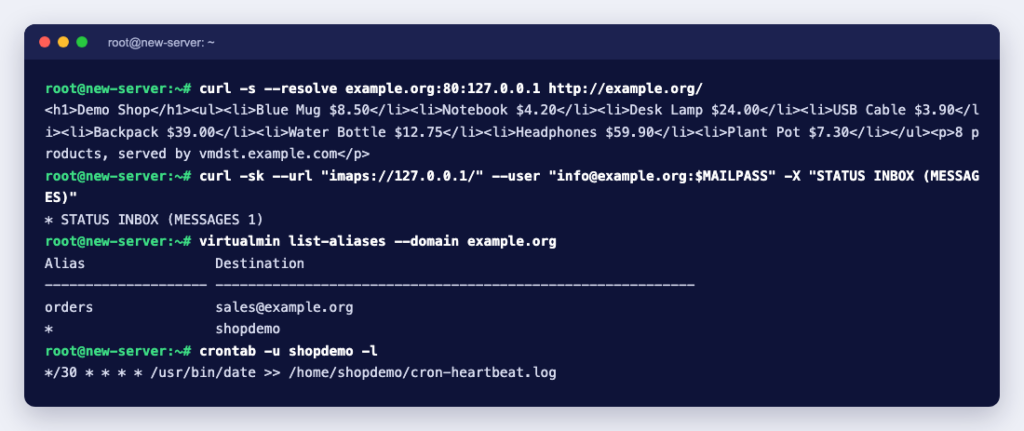
Then the parts your customers notice. The new server answers for the website before DNS changes (using curl --resolve), the migrated mailbox accepts its old password and still holds the email sent before the move, and the forwarder and cron job are in place:
Step 7: Switch DNS and issue SSL
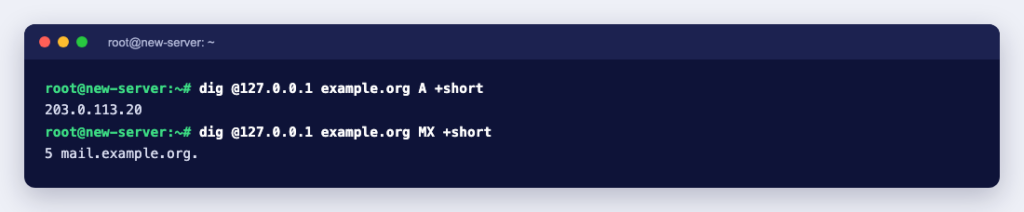
The migrated DNS zone on the new server already points the domain and its mail at the new address:
- Point the domain at the new server: either change the A and MX records where your DNS is hosted, or move the name servers to the new server’s zone.
- Once the domain resolves to the new server, issue a free certificate:
virtualmin generate-letsencrypt-cert --domain example.org. - Update SPF to include the new server’s IP, publish the new DKIM key if your DNS is hosted elsewhere, and send a test email to a large mail provider to check it is delivered.
- Watch both servers for a day. Mail that still arrives at the old server while DNS changes can be copied across afterwards with an IMAP sync; ask the agent to do it mailbox by mailbox.
Step 8: Clean up
Remove the temporary key from both servers, so nothing is left that could reach the old server later:
# on old-server
sed -i '/migrate-temp$/d' /root/.ssh/authorized_keys
# on new-server
rm -f /root/.ssh/migrate_key /root/.ssh/migrate_key.pub
Keep the old server and its backup for at least a week as a fallback, then cancel the cPanel licence and the old server.
What does not move
- Two-factor authentication: according to cPanel, its backup does not include 2FA settings. Users set it up again.
- PostgreSQL databases: Virtualmin’s cPanel importer has no step for them; move them separately with
pg_dump. - SSL certificates on a shared IP: issue new Let’s Encrypt certificates after the DNS switch, as in step 7.
- Reseller accounts: Virtualmin’s reseller feature is part of the paid Pro edition.
Using Codex or Antigravity instead
The same prompt and the same commands work with other agents; only the safety settings have different names. OpenAI’s Codex runs commands in a sandbox and, in its default mode, asks before anything that needs the network, which includes ssh. Google Antigravity has a “Request Review” setting that makes every terminal command wait for your approval. Whichever you use, choose the setting where you approve each command on a live server.
Prompts you can reuse
- “List every cPanel account on old-server with its disk use, databases, mailboxes, forwarders and cron jobs. Change nothing.”
- “Run virtualmin check-config on new-server and fix only what it reports. Explain each fix first.”
- “Back up the account with pkgacct, copy it to new-server with a temporary key, compare checksums, then remove the key.”
- “After the import, compare row counts and table checksums for every database on both servers and show me a table.”
- “Write a runbook of everything we did, with the commands, so I can repeat it for the next account.”
Why so many people are making this move now is in our article on leaving cPanel, and the new 2027 prices are in cPanel price increase 2027. A KVM VPS with full root access is all you need for the new server, and one of our shared hosting plans already runs on Virtualmin. If you would rather have someone do the move with you, hire an expert by the job: $8 per 15 minutes, $15 per 30 minutes or $28 per hour, with no contract.