This guide builds a two-workflow MCP setup in n8n where an AI agent uses a custom Code Tool to convert text to uppercase. The purpose is not the uppercase function itself. The purpose is learning how to write custom JavaScript tools inside an MCP Server and expose them to an AI agent that calls them automatically based on what the user asks.
Once you understand this pattern, you replace the uppercase function with any logic you want: text formatting, data validation, string manipulation, regex extraction, or any transformation that JavaScript can handle. The agent discovers and calls your custom tool the same way regardless of what the tool does.
By the end of this guide you have two active n8n workflows. Workflow 1 is the MCP Server that exposes a custom Code Tool. Workflow 2 is an AI agent that connects to that server, discovers the tool, and calls it when the user asks to convert text.
Why a Custom Code Tool Instead of a Native Node
n8n workflow automation has many built-in nodes. For standard integrations like Google Sheets, Slack, and HTTP requests, native nodes handle everything. But when you need custom logic that no native node covers, or when you want an AI agent to apply that logic dynamically based on natural language input, the Code Tool inside an MCP Server is the correct approach.
The Code Tool exposes JavaScript functions as AI-callable tools through the MCP protocol. The AI agent reads the tool’s name and description, decides when the tool is relevant based on the user’s request, and calls it with the appropriate input. You write the logic once. The agent decides when to use it without any hardcoded routing or conditional nodes.
The Two-Workflow Architecture
Before building, understand what each workflow does.
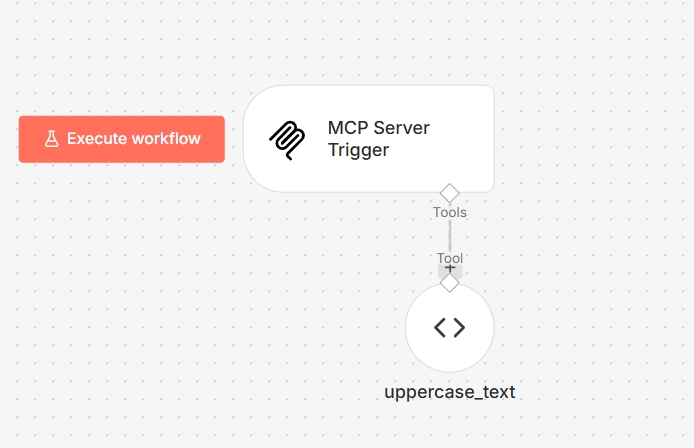
Workflow 1 is the MCP Server connection. It runs an MCP Server Trigger that publishes available tools. You connect a Code Tool to that trigger, which registers the tool with the server. Any AI agent that connects to this server’s endpoint discovers the tool and can call it.
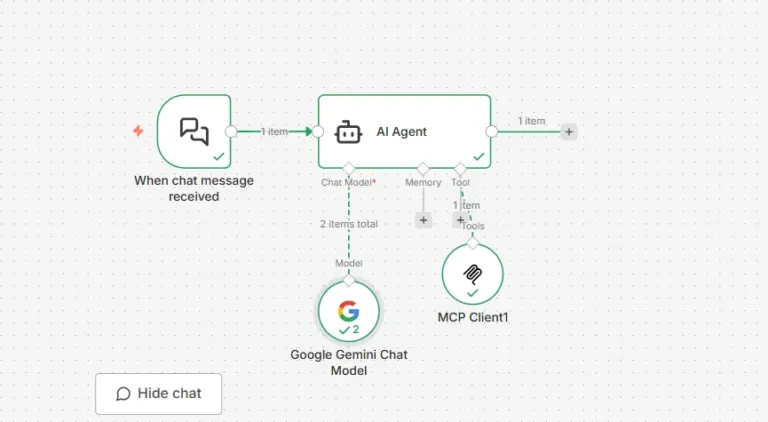
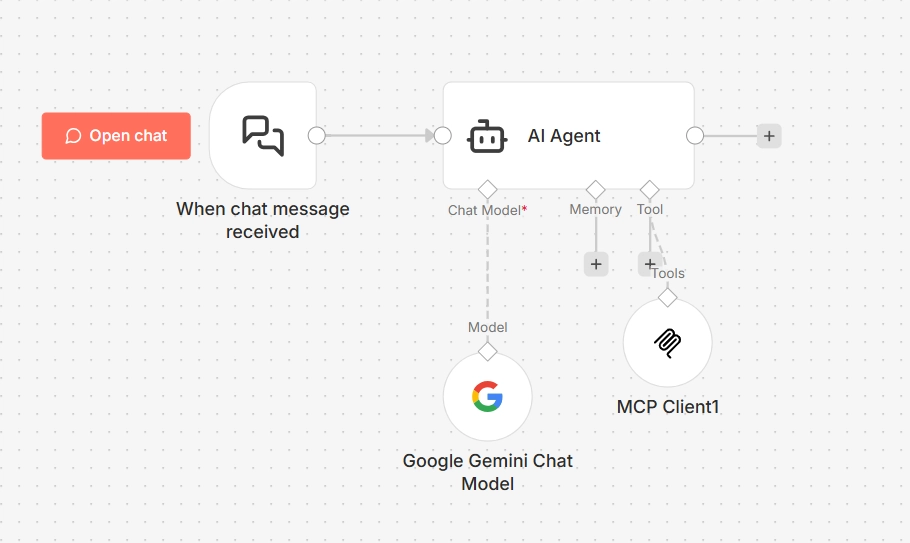
Workflow 2 is the AI Agent. It runs a Chat Trigger that accepts user messages and an AI Agent node that reasons about those messages. Inside the AI Agent, an MCP Client connects to the server from Workflow 1 and makes all registered tools available to the agent.
Workflow 1 (MCP Server):

MCP Server Trigger
        ↓
Convert to Uppercase (Code Tool)


Workflow 2 (AI Agent):

Chat Trigger
      ↓
AI Agent
  ├── Language Model (OpenAI / Claude / OpenRouter)
  └── MCP Client → connects to Workflow 1
Workflow 1: Build the MCP Server
Step 1 – Create a New Workflow
Open n8n and create a new workflow. This workflow becomes your MCP Server. Name it something clear like “Text Utility MCP Server” so you can identify it easily when referencing it from Workflow 2.
Add an MCP Server Trigger node. This is the entry point that listens for tool discovery requests and tool execution calls from MCP clients. When you connect tools to this trigger, they become part of the server’s published tool registry.
The MCP Server Trigger has two endpoint URLs: a Test URL and a Production URL. The Test URL only responds while you have the workflow open in the editor and actively listening. The Production URL responds at any time after you activate the workflow. You use the Production URL in Workflow 2 for any deployment beyond immediate testing.
Step 2 – Add the Code Tool
Click the plus button to add a node after the MCP Server Trigger. In the search box, type Code.
You will see multiple results. Do not select the standard Code node. Look specifically for Code Tool, which is listed as an AI Tool. The Code Tool is a different node category designed specifically for use inside MCP Servers and AI Agent tool sets. If you select the standard Code node by mistake, it will not appear as a callable tool in your AI agent.
If you search for Code and do not see Code Tool in the results, search for Tool instead and look for Code Tool in the tool-specific results that appear.
Step 3 – Configure the Code Tool
The Code Tool requires three things: a name, a description, and the JavaScript function. The name and description are not just labels. The AI agent reads them to decide when the tool is relevant. A clear, specific description produces more reliable tool calling behavior than a vague one.
Set the name to:
Convert to UppercaseSet the description to:
Converts any text into uppercase.
Use this tool whenever the user asks to capitalize text.
The second sentence in the description is important. It gives the AI agent an explicit instruction about when to call this tool. Without it, the agent relies entirely on the name and its own interpretation, which can produce inconsistent behavior across different language models.
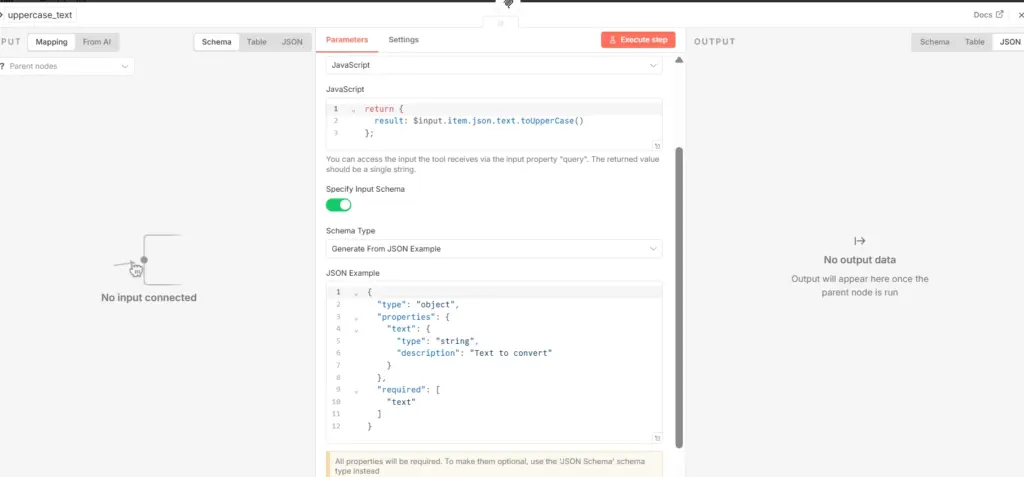
Step 4 – Write the JavaScript Function
In the code section of the Code Tool, paste this JavaScript:
return {
  result: $input.item.json.text.toUpperCase()
};
This function reads the text field from the input the MCP Client sends, converts it to uppercase using JavaScript’s native toUpperCase() method, and returns the result in a result field.
The $input.item.json path is n8n’s way of accessing the JSON data passed to the current node. When the AI agent calls this tool, it passes a JSON object containing the input fields. The text field comes from the input schema you define in the next step.
Step 5 – Enable Input Schema
Turn on the Input Schema toggle in the Code Tool configuration. The input schema tells the MCP protocol what fields this tool accepts, their types, and which ones are required. The AI agent uses this schema to know exactly what data to pass when calling the tool.
Paste this JSON schema:
{
  "type": "object",
  "properties": {
    "text": {
      "type": "string",
      "description": "Text to convert"
    }
  },
  "required": [
    "text"
  ]
}
This schema defines one field named text of type string that is required. When the user asks the AI agent to convert something, the agent extracts the relevant text from the user’s message and passes it as the text field to this tool.
Without the input schema, the MCP protocol cannot communicate to the AI agent what inputs the tool expects. The agent either passes wrong fields or fails to call the tool at all. Always define the input schema on every Code Tool you build.
Step 6 – Connect the Nodes
Connect the MCP Server Trigger to the Convert to Uppercase Code Tool. Your Workflow 1 structure should look like this:
MCP Server Trigger
        ↓
Convert to Uppercase (Code Tool)
Step 7 – Activate the Workflow and Copy the Production URL
Click the Active toggle to activate Workflow 1. After activation, open the MCP Server Trigger node and copy the Production URL. It looks like:
https://yourdomain.com/mcp/your-unique-id/sseSave this URL. You use it in Workflow 2 to connect the MCP Client to this server.
Do not close Workflow 1. Keep it active. If you deactivate it, the Production URL stops responding and Workflow 2’s MCP Client cannot discover or call the tools.
Workflow 2: Build the AI Agent
Step 8 – Create a Second Workflow
Create a new workflow and name it something like “Text Utility AI Agent”. This workflow handles user interaction and connects to the MCP Server from Workflow 1.
Step 9 – Add the Chat Trigger
Add a Chat Trigger node as the first node. The Chat Trigger opens n8n’s built-in chat interface and provides the chatInput variable that the AI Agent node requires. Using a Manual Trigger instead of a Chat Trigger is one of the most common mistakes in MCP agent setups. The AI Agent expects input in chatInput and throws an error if that variable is not present.
Step 10 – Add the AI Agent Node
Add an AI Agent node and connect the Chat Trigger to it.
Inside the AI Agent node, connect a language model. This can be any model your n8n instance has credentials for: OpenAI GPT-4o-mini, Anthropic Claude Haiku, a model via OpenRouter, or any other compatible LLM. The language model handles the reasoning: reading the user’s message, deciding whether to call a tool, formulating the call, and composing the final response.
Step 11 – Add the MCP Client as a Tool
Inside the AI Agent node, add an MCP Client in the tools section. Configure it with these settings:
Endpoint:       [paste the Production URL from Workflow 1 here]
Transport:      SSE (Server-Sent Events)
Authentication: None
Tools:          All
Setting Tools to All means the MCP Client retrieves every tool the server exposes. The AI Agent then has access to all of them and decides which one to call based on what the user asks. As you add more Code Tools to Workflow 1, the MCP Client in Workflow 2 automatically discovers them without any reconfiguration.
Step 12 – Activate Workflow 2
Click the Active toggle to activate Workflow 2. Both workflows must be active for the complete system to work. An inactive workflow does not respond to any requests, including MCP tool calls.
Testing the Complete System
Open the Chat Trigger interface in Workflow 2 by clicking the chat icon. Send this message:
Convert "hello world" to uppercaseWatch the execution. The AI Agent receives the message and evaluates it. It reads the available tools through the MCP Client, finds the Convert to Uppercase tool with its description “Use this tool whenever the user asks to capitalize text”, and decides this tool is relevant. It calls the tool through the MCP Client, passing text: "hello world". The Code Tool runs "hello world".toUpperCase() and returns HELLO WORLD. The AI Agent receives the result and formulates its response.
Expected output:
HELLO WORLDIf the test passes, your MCP Server and AI Agent are communicating correctly.
What to Do When It Does Not Work
The MCP Client says it connected but found no tools
The MCP Server Trigger has no Code Tool connected to it, or the Code Tool is connected but Workflow 1 is not active. Check that the Convert to Uppercase node is connected to the MCP Server Trigger and that the workflow is toggled Active. An active workflow with a disconnected tool exposes zero tools to the MCP Client.
The agent answers without calling the tool
The language model decided the tool was not relevant. This usually means the description on the Code Tool is too vague. Strengthen the description with explicit instructions. Instead of “Converts text to uppercase”, use “Converts any text into uppercase. Use this tool whenever the user asks to capitalize, convert to uppercase, or make text all caps.” More specific trigger language in the description produces more consistent tool calling.
The Code Tool runs but returns an error
The most common cause is a field name mismatch between the input schema and the JavaScript function. The schema defines text as the field name. The JavaScript reads $input.item.json.text. If either of these uses a different name, the function receives undefined and toUpperCase() fails. Verify both use identical field names.
The Production URL does not respond
Workflow 1 is not active or the URL was copied from the Test URL field instead of the Production URL field. The Test URL only responds while the editor is open. Copy the Production URL from the MCP Server Trigger node when Workflow 1 is active.
Extending the MCP Server With More Tools
The value of this pattern becomes clear when you add more tools to the same MCP Server. Each new Code Tool you connect to the MCP Server Trigger in Workflow 1 becomes automatically available to the AI Agent in Workflow 2 without any changes to the agent workflow.
Add a word count tool:
const words = $input.item.json.text.trim().split(/\s+/).filter(w => w.length > 0);
return {
  result: words.length,
  words: words
};
With input schema:
{
  "type": "object",
  "properties": {
    "text": {
      "type": "string",
      "description": "Text to count words in"
    }
  },
  "required": ["text"]
}
You can add a reverse text tool:
return {
  result: $input.item.json.text.split("").reverse().join("")
};
Add a slug generator for URLs:
const slug = $input.item.json.text
  .toLowerCase()
  .trim()
  .replace(/[^\w\s-]/g, "")
  .replace(/[\s_-]+/g, "-")
  .replace(/^-+|-+$/g, "");

return { result: slug };
Add an email extractor:
const emailRegex = /[a-zA-Z0-9._%+-]+@[a-zA-Z0-9.-]+\.[a-zA-Z]{2,}/g;
const emails = $input.item.json.text.match(emailRegex) || [];
return {
  result: emails,
  count: emails.length
};
Connect each of these Code Tools to the same MCP Server Trigger in Workflow 1. The updated tool list:
MCP Server Trigger
        ├── Convert to Uppercase
        ├── Count Words
        ├── Reverse Text
        ├── Generate Slug
        └── Extract Emails
Now ask the AI Agent in Workflow 2:
How many words are in "The quick brown fox jumped over the lazy dog"?The agent calls Count Words instead of Convert to Uppercase because the description matches the request. Send another message:
Generate a URL slug for "How to Build MCP Agents in n8n"The agent calls Generate Slug. The same agent, the same MCP Client, the same Workflow 2 configuration handles all of these because the MCP Server dynamically exposes the right tool for each request.
Why This Pattern Matters
The separation between the MCP Server and the AI Agent produces a text utility system that is easy to maintain and extend. Adding a new text operation means adding a Code Tool to Workflow 1. Removing a tool means disconnecting it from the trigger. No changes to the agent, no changes to routing logic, no conditional nodes required.
Each Code Tool is independently testable. You can run the MCP Server workflow directly to verify a tool’s JavaScript logic before connecting it to an agent. If a tool produces wrong output, you fix the JavaScript in that tool without touching anything else.
The AI agent handles the decision of which tool to use. You do not write if the user says "uppercase" then call this tool logic. You write clear tool descriptions and let the language model match requests to tools. This produces a more flexible system that handles variations in how users phrase requests without requiring you to anticipate every phrasing in advance.
Conclusion
Building a Text Utility MCP Server in n8n teaches the complete pattern for exposing custom JavaScript logic to an AI agent through the Model Context Protocol. The MCP Server Trigger publishes tools. The Code Tool wraps your JavaScript logic. The input schema defines what data the tool accepts. The AI Agent reads the tool descriptions and calls the right tool based on what the user asks.
This pattern scales from one tool to dozens. Every Code Tool you add to the MCP Server becomes available to every AI Agent connected to that server. The agent’s capability grows with the server’s tool registry without any architectural changes. Start with uppercase conversion, add word counting, add slug generation, add email extraction, and your agent handles an expanding range of text utility tasks from a single natural language interface.
As your MCP projects become more advanced, you’ll likely want to host your MCP servers, APIs, and n8n workflows on a reliable VPS instead of a local machine. I used a KVM VPS hosting for my experiments, which made it easy to keep my MCP server accessible and test AI agents without worrying about local network limitations. If you’re planning to build production-ready AI automations, a VPS is a practical next step.
FAQ
1. Do I need an API key to learn MCP in n8n?
No. You can start by building local MCP tools, such as a calculator or text utility, without using any external APIs or API keys. This helps you understand the fundamentals of MCP before integrating third-party services.
2. What is the difference between an MCP Client and an MCP Server?
An MCP Client connects to an MCP Server and discovers the available tools. An MCP Server hosts and exposes those tools, allowing an AI agent to invoke them when needed.
3. Can I build an MCP AI Agent in n8n without coding?
Yes. n8n provides built-in nodes such as AI Agent, MCP Client, and MCP Server Trigger, allowing you to build basic MCP workflows with minimal code. For custom tools, you can use JavaScript in the Code Tool node.
4. Why isn’t my AI Agent calling the MCP tool?
Common reasons include using an incorrect MCP endpoint, the MCP Server workflow not being active, missing input schemas for custom tools, or the AI not determining that the tool is necessary for the user’s request.
5. Can I connect multiple MCP tools to a single AI Agent?
Yes. A single AI Agent can use multiple MCP tools, such as calculators, weather services, GitHub, Google Sheets, databases, and custom APIs, allowing it to choose the appropriate tool based on the user’s request.