
If your server is exposed to the internet, it’s already being scanned, hit, and tested by bots whether you notice it or not. Most setups ignore this until something breaks. Instead of reacting late, you can automate a basic defense layer using n8n. In this guide, you’ll build a simple system that detects repeated requests from the same IP and blocks them automatically at the server level. It’s not enterprise security, but it’s a practical step toward protecting your workflows and infrastructure.
You need a VPS with root access, n8n workflow automation installed, and UFW active. This workflow requires server-level command execution. It does not work on n8n Cloud because you cannot run firewall commands there.
How n8n Sees Incoming Traffic
n8n does not read raw server logs by default. It cannot watch /var/log/nginx/access.log without additional scripting. What it can do is receive webhook requests directly and inspect the headers of those requests including the IP address of the sender.
This guide uses the webhook approach. Every request that hits your protected endpoint passes through n8n first. n8n extracts the IP, counts how many times that IP has hit the endpoint in the current session, and blocks it if the count exceeds your threshold.
The limitation is this only protects the specific webhook endpoint you define in n8n, not your entire server. For full server protection, the upgrade path uses Nginx log parsing or fail2ban covered at the end of this guide.
Step 1 – Create the Protected Webhook Endpoint
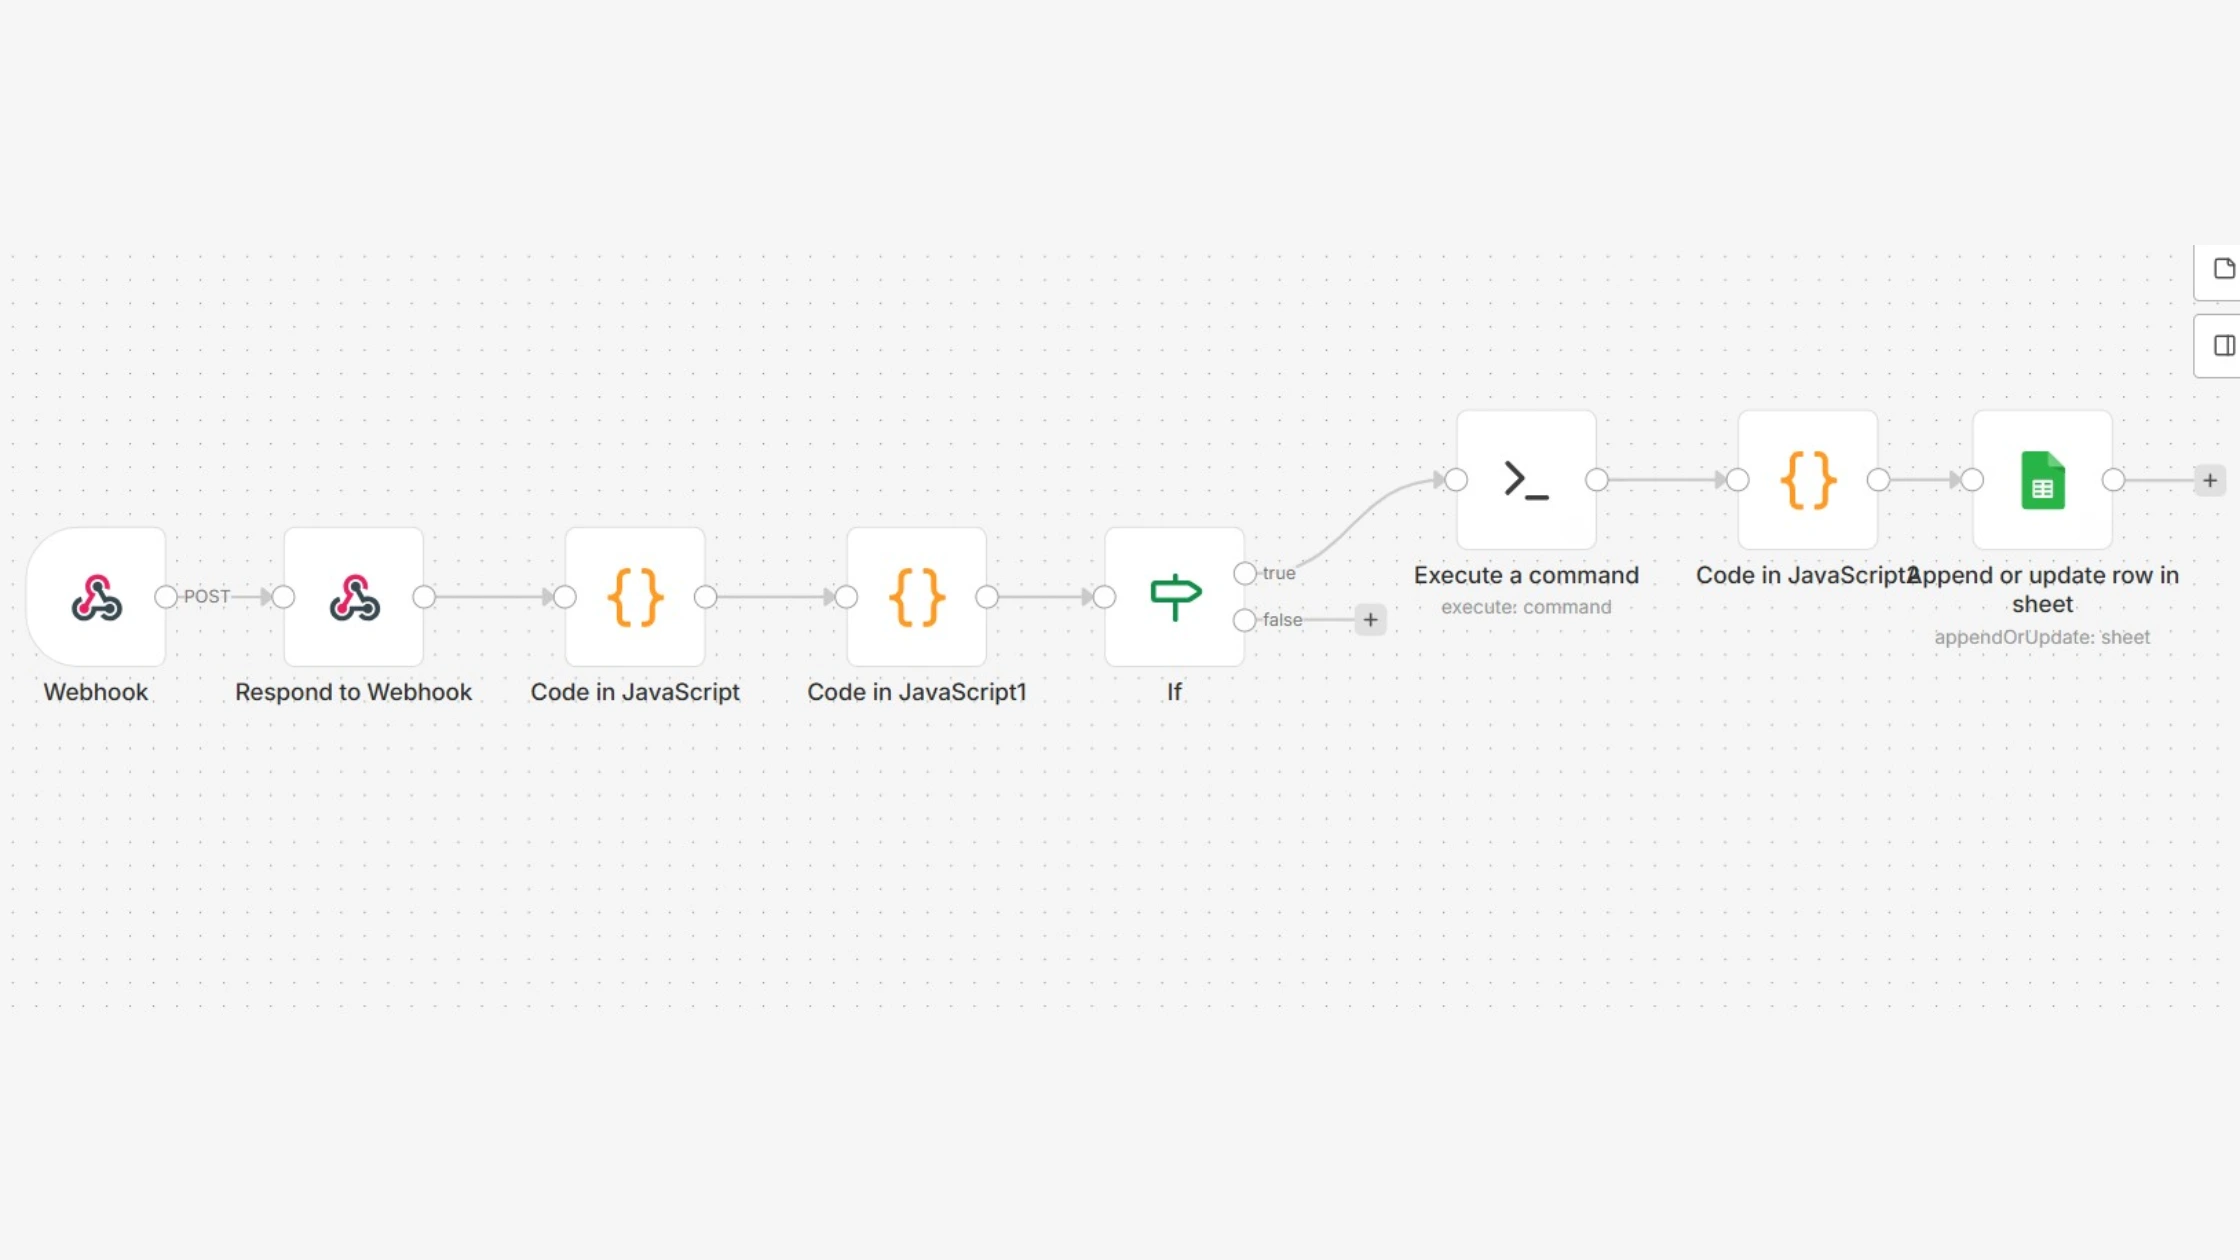
Add a Webhook node. Set the method to POST and the path to secure-endpoint. This creates the endpoint at:
https://yourdomain.com/webhook/secure-endpointSet Response Mode to “Using Respond to Webhook Node” this keeps the connection open until your workflow explicitly sends a response, giving you control over what the client receives.
Activate the workflow before testing. The production webhook URL only responds when the workflow is active. The test URL in the editor only works while you have the editor open and waiting.
Step 2 – Extract the IP Address
Add a Code node directly after the Webhook node. This node extracts the real client IP from the request headers.
const headers = $json.headers;

const ip =
  headers["x-forwarded-for"]?.split(",")[0].trim() ||
  headers["x-real-ip"] ||
  headers["remote-addr"] ||
  "unknown";

return [{ json: { ip } }];
The priority order matters. x-forwarded-for is the header Nginx sets when it proxies requests to n8n it contains the real client IP. Without a reverse proxy, x-real-ip or remote-addr holds the IP. The .split(",")[0].trim() call handles cases where x-forwarded-for contains multiple IPs in a chain you want the first one, which is the original client.
If you are running n8n without Nginx in front of it, x-forwarded-for will be empty. Test which header your setup populates by logging all headers from a test request:
return [{ json: { all_headers: $json.headers } }];Run a curl request and check the output to see which header contains your IP.
Step 3 – Count Requests Per IP
n8n has a static Data Store node, but for counting requests across multiple webhook hits in the same session, a Code node with in-memory state works for demonstration. For production, use Redis lightning-fast database covered in the upgrades section. Add a Code node after the IP extraction node:
// Access workflow static data (persists across executions in the same n8n session)
const workflowStaticData = $getWorkflowStaticData('global');

const ip = $json.ip;

// Initialize counter for this IP if it doesn't exist
if (!workflowStaticData.ipCounts) {
  workflowStaticData.ipCounts = {};
}

if (!workflowStaticData.ipCounts[ip]) {
  workflowStaticData.ipCounts[ip] = 0;
}

// Increment counter
workflowStaticData.ipCounts[ip]++;

const count = workflowStaticData.ipCounts[ip];

return [{ json: { ip, count } }];
$getWorkflowStaticData('global') gives you a persistent object that survives across individual executions within the same n8n session. It resets when n8n restarts which is the key limitation of this approach. For persistent blocking that survives restarts, you need external storage.
Step 4 – Detect Suspicious Activity
Add an IF node after the counter. Set the condition:
Value 1:   {{ $json.count }}
Operation: Greater Than
Value 2:   10
This routes the execution into two paths. The TRUE branch fires when the IP has hit the endpoint more than 10 times this is your blocking path. The FALSE branch fires for normal traffic this continues to the response node.
Adjust the threshold based on your use case. A public API endpoint might allow 100 requests before blocking. A login endpoint should block after 5 failed attempts. A webhook that should only fire once per event should block after 3 hits.
Step 5 – Block the IP with UFW
Connect the TRUE branch of the IF node to an Execute Command node. This node runs a shell command directly on your VPS. Set the command:
sudo ufw deny from {{$json.ip}} to anyBefore this works, you must grant n8n’s process user permission to run UFW without a password prompt. By default, n8n runs as the www-data user when installed as a service. Open the sudoers file:
sudo visudoAdd this line at the bottom:
www-data ALL=(ALL) NOPASSWD: /usr/sbin/ufwSave and exit. This grants only the specific permission needed running UFW not full sudo access. Without this line, the Execute Command node returns a “permission denied” error and the block never applies. Verify UFW is active before testing:
sudo ufw statusIf it shows “Status: inactive”, enable it:
sudo ufw enable
sudo ufw allow ssh
sudo ufw allow 443
sudo ufw allow 5678
Always allow SSH before enabling UFW or you lock yourself out of the server.
Step 6 – Log the Block
Add a code node after the Execute Command node on the TRUE branch. Log the blocked IP and timestamp so you have a record of what got blocked and when:
const ip = $json.ip;
const count = $json.count;

return [
  {
    json: {
      blocked_ip: ip,
      request_count: count,
      blocked_at: new Date().toISOString(),
      action: "ufw_deny_applied"
    }
  }
];
Connect this to a Google Sheets node, a database write, or an email/Slack notification. Without logging, you have no visibility into what your automation is blocking. In a production setup, every blocked IP should be auditable.
Step 7 – Respond to the Webhook
Add a Respond to Webhook node. Place the Respond to Webhook node immediately after the Webhook node so the request is acknowledged instantly, then process blocking logic asynchronously. For the normal path (FALSE branch), return a standard response:
{
  "status": "ok"
}
For the blocked path (TRUE branch), you can either return the same response so the attacker does not know they are blocked or return a 429 status code:
{
  "status": "too_many_requests",
  "message": "Rate limit exceeded"
}
Returning a generic ok response from both paths is the more secure choice. It gives bots and attackers no signal that their IP is now blocked at the firewall level.
Complete Workflow Structure
Webhook (POST /secure-endpoint)
      ↓
Respond to Webhook (immediate)
      ↓
Code: Extract IP
      ↓
Code: Count Requests (static data)
      ↓
IF: count > 10
      ↓              ↓
   TRUE            FALSE
      ↓
Execute Command
(ufw deny IP)
      ↓
Code (Log blocked IP)
      ↓
Google Sheets (optional logging)
Testing the Workflow
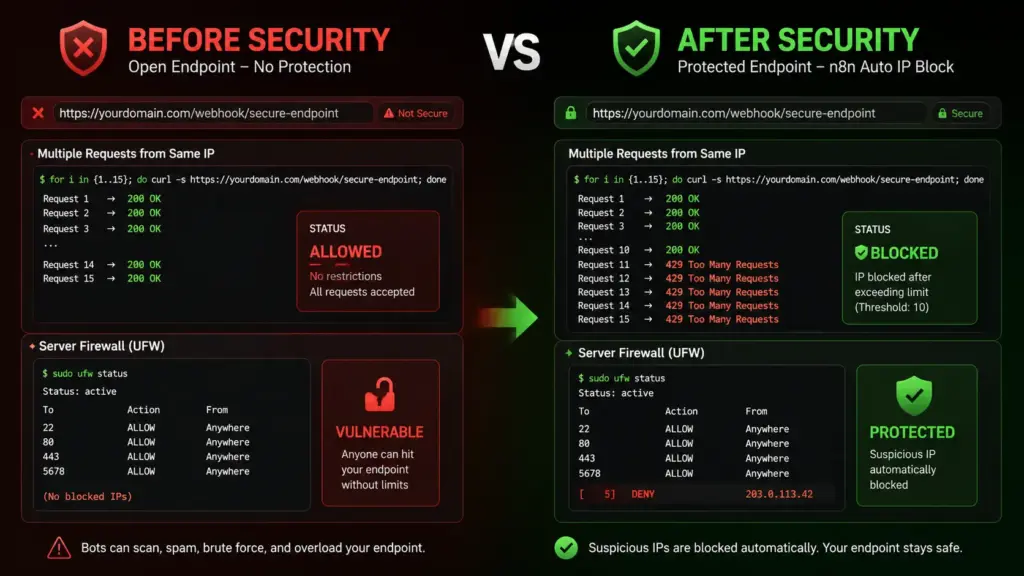
Activate the workflow. Then send 15 rapid requests from your terminal to trigger the threshold:
for i in {1..15}; do
  curl -s https://yourdomain.com/webhook/secure-endpoint
  echo " - Request $i"
done
After the 11th request, the Execute Command node fires. Verify the block applied:
sudo ufw status numberedYou should see an entry like:
[ 5] DENY IN 203.0.113.42To remove a test block:
sudo ufw delete deny from 203.0.113.42 to anyAlways clean up test blocks from your own IP before finishing the test.
Common Mistakes That Break This Workflow
Wrong IP header – If your n8n sits behind Nginx and you read remote-addr, you get Nginx’s internal IP, not the client’s real IP. Always check x-forwarded-for first when a reverse proxy is in place. Log all headers from a test request to confirm which header carries the real IP before building the extraction logic.
UFW permission denied – The Execute Command node fails silently or returns an error if the sudoers entry is missing or incorrectly formatted. Test the command manually as the n8n user first:
sudo -u www-data sudo ufw deny from 1.2.3.4 to anyIf this fails, the Execute Command node will fail with the same error.
Workflow not active – The production webhook URL returns 404 when the workflow is inactive. The editor’s test URL only works in the editor. Always toggle the workflow to Active and use the production URL for real testing.
Using test webhook URL – The test URL at the top of the webhook node is temporary. It only responds while you have the workflow editor open and are actively testing. Using this URL in production means your endpoint randomly stops responding. Always use the production URL from the workflow’s active state.
Counter resets on restart – $getWorkflowStaticData persists across executions but resets when n8n restarts. An attacker who hits your threshold and then waits for your server to reboot starts with a fresh count. For production, replace the in-memory counter with Redis.
Upgrade to Redis for Persistent Counting
Replace the static data counter with a Redis call using the Execute Command node:
redis-cli INCR ip:{{$json.ip}}Read the count back:
redis-cli GET ip:{{$json.ip}}Set an automatic expiry so IPs reset after 24 hours:
redis-cli EXPIRE ip:{{$json.ip}} 86400With Redis, the counter survives n8n restarts, server reboots, and workflow redeployments. Blocked IPs persist until you explicitly remove them or the TTL expires.
Upgrade to Full Server Protection with Nginx Rate Limiting
This workflow only protects the specific webhook endpoint. For full server protection, add rate limiting directly in Nginx before traffic reaches n8n:
# In your nginx.conf or site config
limit_req_zone $binary_remote_addr zone=webhook:10m rate=10r/m;

server {
    location /webhook/ {
        limit_req zone=webhook burst=5 nodelay;
        limit_req_status 429;
        proxy_pass http://localhost:5678;
    }
}
This blocks any IP sending more than 10 requests per minute to any webhook endpoint at the Nginx level before the request ever reaches n8n. The n8n workflow then handles the application-level logic on top of this network-level protection.
Limitations to Understand
This is an automation layer, not a firewall replacement. It has three clear boundaries.
The in-memory counter resets on every n8n restart. Any attacker who knows your restart schedule can reset their count by waiting. Redis eliminates this gap.
The workflow only protects endpoints you route through it. Direct server attacks, SSH brute force, and traffic to other ports bypass this entirely. Use fail2ban and Nginx rate limiting for broader server protection.
UFW blocks at the server level, but a determined attacker with many IP addresses rotates through them faster than your threshold catches them. This protection works against single-IP bots and basic scraping, not against distributed botnets.
For any setup running real user traffic, this workflow works best as a secondary layer on top of Nginx rate limiting and fail2ban, not as your primary security mechanism. What it gives you that those tools do not is visibility inside n8n every block is an execution you can inspect, log, and act on with any downstream integration your workflow supports.
Conclusion
Automation is also about protection. By adding a simple IP blocking workflow in n8n, you reduce noise, prevent basic abuse, and gain more control over your server environment. This setup won’t replace full security tools, but it creates a proactive layer that most beginners skip. Once this is in place, you can extend it with smarter detection, logging, and rate limiting to build a stronger, more resilient system.You can’t run firewall-level automation like this on shared hosting.
You need full control over your server. Deploy n8n on a Ucartz VPS hosting and test this workflow in minutes.
FAQ
1. How does n8n block suspicious IPs?
n8n detects repeated requests from the same IP and triggers a firewall command to block it.
2. Is n8n IP blocking secure for production use?
It provides basic protection but should be combined with tools like firewalls and fail2ban.
3. Can n8n detect real attacks or just repeated requests?
By default it detects repeated hits, but it can be extended to analyze patterns.
4. Do I need a VPS to block IPs using n8n?
Yes, because firewall-level commands require server access.
5. What is the best threshold for blocking an IP?
A common starting point is 10–20 requests within a short time window.