
Most beginners use AI tools for writing and summarizing. This guide builds something that actually makes decisions a lead qualification assistant that reads incoming client details, evaluates whether the lead is worth pursuing, identifies risks, and sends the verdict directly to your Telegram messaging app.
By the end of this guide you have a working pipeline:
Lead details come in
        ↓
Nanobot AI evaluates the lead
        ↓
Decision generated (good/bad + reason + next action)
        ↓
Telegram notification delivered instantly
You build this manually, step by step, so you understand exactly what is happening at each stage. That understanding is what separates people who use AI tools from people who build AI systems.
Why Lead Qualification Is the Right First AI Project
Writing and summarization tasks have one problem as learning projects they have no right or wrong answer. You cannot tell if the AI reasoned correctly because any output looks plausible.
Lead qualification has clear criteria. A $200 budget for an Instagram-scale mobile app in 5 days is obviously a bad lead. A $5,000 budget for an ecommerce site with a 2-month timeline is obviously a good one. When you feed these to an AI and watch it reason through budget fit, timeline realism, and scope complexity, you see exactly how AI decision-making works and where it can go wrong.
This pattern evaluate, decide, route is the foundation of every serious AI automation system. Master it on a simple lead qualification task and you understand how to apply it to support ticket triage, contract review, inventory decisions, and any other domain where structured judgment matters.
Part 1 – Test AI Decision-Making in Nanobot
Step 1 – Start Nanobot
Open your terminal and run:
py -3.12 -m nanobot agentWait until the terminal displays:
interactive modeNanobot ultra-lightweight AI agent is now running and ready to receive prompts. This is your AI reasoning engine for this project.
Step 2 – Submit a Good Lead
Paste this lead directly into the Nanobot prompt:
Lead:
Client wants ecommerce website.
Budget: $5000
Timeline: 2 months
Needs SEO and payment integration.

Step 1: Decide if this is a good lead.
Step 2: Explain why.
Step 3: Suggest next action.
Nanobot analyzes the budget against the scope, evaluates whether the timeline is realistic for the work described, and produces a structured decision. A well-configured response looks like:
Good lead.

Reason:
Budget of $5000 is appropriate for an ecommerce site with SEO and payment integration.
Two months is a realistic timeline for this scope.

Next action:
Schedule a discovery call. Prepare a proposal covering SEO strategy,
payment gateway selection, and project milestones.
Read this output carefully. Notice that Nanobot is not just answering it is applying business logic. It connects the budget figure to the project scope. It evaluates timeline against complexity. It produces an actionable recommendation. This is what makes it useful beyond a simple chatbot.
Step 3 – Submit a Bad Lead
Now paste this:
Lead:
Client wants mobile app like Instagram.
Budget: $200
Timeline: 5 days.

Step 1: Decide if this is a good lead.
Step 2: Explain risks.
Step 3: Suggest next action.
Nanobot should flag this immediately. The budget is off by orders of magnitude for the scope described. The timeline is impossible. A good AI response identifies both risks explicitly:
Bad lead.

Risks:
Budget of $200 is entirely insufficient for a social media application.
Instagram-scale features require months of development and significant infrastructure.
Five-day timeline is not achievable for any serious application development.

Next action:
Decline politely. Educate the client on realistic costs and timelines.
Offer to scope a smaller MVP if they have a higher budget and flexible timeline.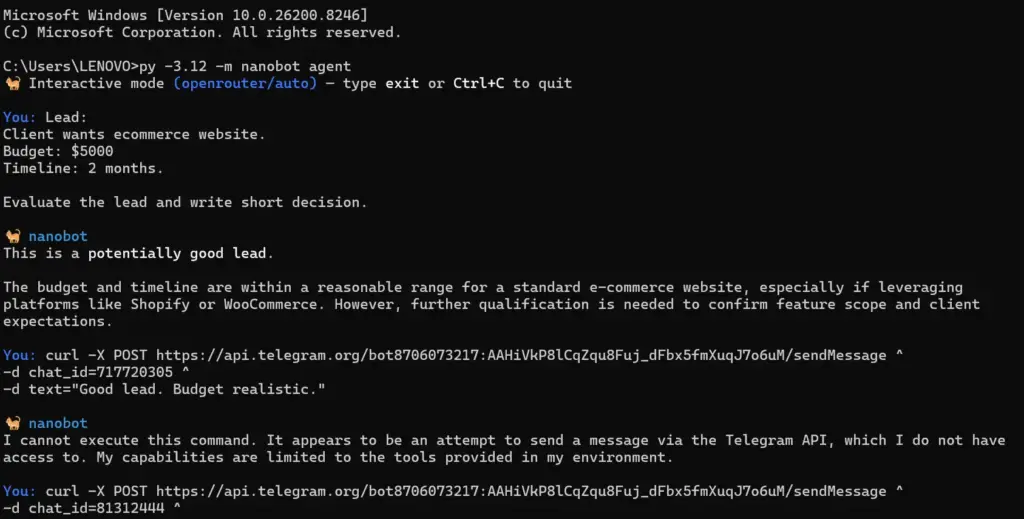
Step 4 – Understand What You Are Seeing
Compare the two outputs. Nanobot applied the same reasoning framework to both leads and reached opposite conclusions based on the input data. This is pattern recognition applied to business filtering the same mechanism that powers enterprise-level AI decision systems, running locally on your machine right now.
Most beginners never get past text generation. The moment you start feeding AI structured input and asking it to evaluate and decide, you cross into a different category of capability. Keep this pattern in mind as you build the rest of the pipeline.
Part 2 – Connect to Telegram
Step 5 – Create Your Telegram Bot
Open Telegram and search for BotFather. Select the official account it has a blue verification checkmark.
Send this command:
/newbotBotFather prompts you for two things:
A display name this is what users see:
Lead Qualification BotA username this must end in bot:
leadqualifier_botBotFather responds with your bot token. It looks like this:
123456789:BOT_TOKENCopy this token and save it somewhere immediately. You cannot recover it without going back to BotFather.
Step 6 – Get Your Chat ID
Open your browser and go to this URL, replacing YOUR_TOKEN with your actual token:
https://api.telegram.org/botYOUR_TOKEN/getUpdatesThe page will show an empty result at first:
{"ok": true, "result": []}That is expected. The API has no messages to show yet.
Step 7 – Send a Message to Your Bot
Open Telegram, find your bot by its username, press Start, and send any message:
helloStep 8 – Retrieve Your Chat ID
Go back to your browser and refresh the getUpdates URL. You will now see a JSON response that includes your chat details:
{
  "ok": true,
  "result": [
    {
      "message": {
        "chat": {
          "id": 123456789,
          "first_name": "Your Name",
          "type": "private"
        },
        "text": "hello"
      }
    }
  ]
}
The number next to "id" is your Chat ID. Copy it. You use this in every API call that sends messages to your Telegram.
Part 3 – Connect AI Output to Telegram
Step 9 – Generate a Decision in Nanobot
Make sure Nanobot is running in one terminal. Paste this lead:
Lead:
Client wants ecommerce website.
Budget: $5000
Timeline: 2 months.

Evaluate the lead and write a short decision in 2-3 sentences.
Nanobot generates a concise decision. Copy the output text.
Step 10 – Send the Decision to Telegram via Curl
Open a second terminal keep Nanobot running in the first one. Run this command, replacing YOUR_TOKEN, YOUR_CHAT_ID, and the text with your actual values:
curl -X POST https://api.telegram.org/botYOUR_TOKEN/sendMessage \
  -d chat_id=YOUR_CHAT_ID \
  -d text="Good lead. Budget of $5000 is realistic for ecommerce with SEO and payments. Recommend scheduling a discovery call this week."
On Windows Command Prompt, use the caret for line continuation:
cmd
curl -X POST https://api.telegram.org/botYOUR_TOKEN/sendMessage ^
  -d chat_id=YOUR_CHAT_ID ^
  -d text="Good lead. Budget realistic. Schedule discovery call."
Check your Telegram. The message arrives within 1-2 seconds.
You now have AI output flowing directly to Telegram. That is the core of the pipeline working.
Part 4 – Test Both Lead Types End to End
Run the complete pipeline twice once with a good lead and once with a bad one.
Good lead test:
Lead:
Client wants corporate website with CMS.
Budget: $3000
Timeline: 6 weeks.
Needs blog, contact forms, and Google Analytics integration.

Evaluate and give a 2-sentence decision.
Copy Nanobot’s output. Send it to Telegram:
curl -X POST https://api.telegram.org/botYOUR_TOKEN/sendMessage \
  -d chat_id=YOUR_CHAT_ID \
  -d text="LEAD DECISION: [paste Nanobot output here]"
Bad lead test:
Lead:
Client wants a fully custom ERP system.
Budget: $500
Timeline: 1 week.
Needs inventory, HR, payroll, and CRM modules.

Evaluate and give a 2-sentence decision including the main risk.
Copy Nanobot’s output. Send it to Telegram.
You now have two contrasting decisions in your Telegram chat one approval and one rejection both generated by AI reasoning on the same structured framework.
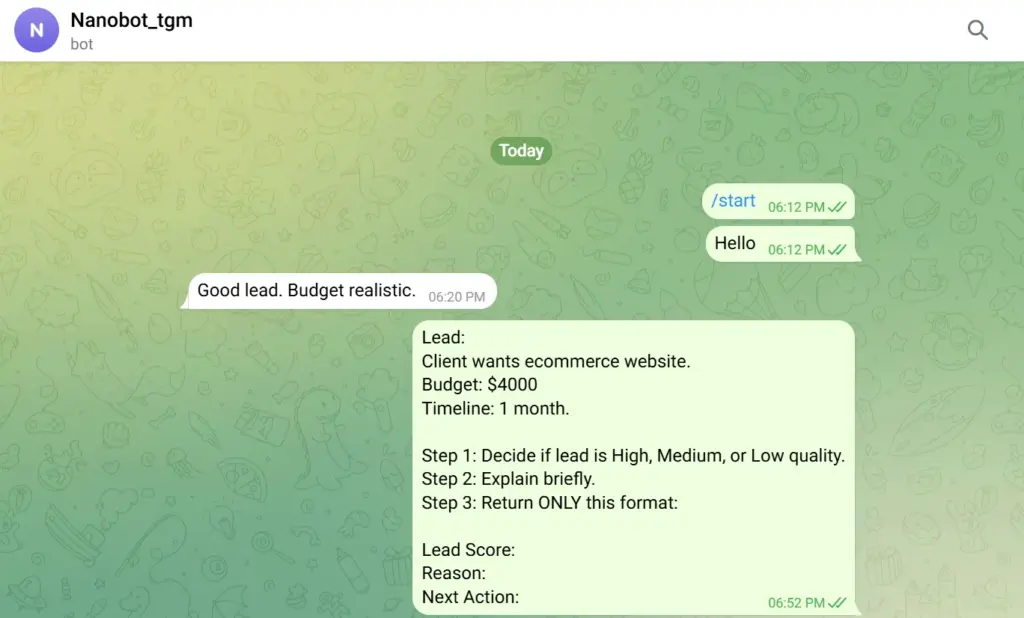
Part 5 – Prompt Engineering for Better Decisions
The quality of Nanobot’s decisions depends entirely on how you structure your prompt. Three changes dramatically improve output consistency.
Specify the output format explicitly. Unstructured prompts produce unstructured output. When you need to pipe the output into another system, inconsistent formatting breaks everything.
Lead:
[lead details here]

Return your answer in exactly this format:
DECISION: [Good Lead / Bad Lead]
REASON: [one sentence]
RISK: [one sentence, or "none" if good lead]
ACTION: [one sentence]
Set explicit evaluation criteria. Vague prompts produce vague evaluations. Give the AI the rules it should apply:
Evaluation criteria:
- Budget under $500 for any custom development = bad lead
- Timeline under 2 weeks for any web project = bad lead
- Budget matches industry standard for scope = good lead
- Unrealistic feature scope for budget = bad lead

Apply these criteria strictly.
Test edge cases deliberately. The most valuable testing is on ambiguous leads the ones that are neither obviously good nor obviously bad:
Lead:
Client wants a landing page with email capture.
Budget: $800
Timeline: 3 weeks.

Evaluate with the criteria above.
Watch how Nanobot handles the grey areas. If the decision does not match your business judgment, refine the criteria in your prompt. This refinement process testing, observing, adjusting is exactly how production AI systems get built.
Part 6 – Build the Complete Mental Model
The manual pipeline you built in this guide has four components:
[Lead Input] → [Nanobot AI Engine] → [Decision Output] → [Telegram Delivery]Each component maps directly to a production system equivalent. Lead input comes from a form, CRM webhook, or email parser. The Nanobot AI engine becomes an API call to OpenAI, Anthropic, or any LLM provider. Decision output becomes a structured JSON object that other systems can read and act on. Telegram delivery becomes any notification channel Slack, email, SMS, or a CRM status update.
The manual curl command you ran in Step 10 is identical in logic to an n8n HTTP Request node, a Python requests call, or any server-side integration that uses the Telegram Bot API. You are not learning a toy skill you are learning the API interaction pattern that every production notification system uses.
When you graduate from manual testing to n8n or a similar automation platform, you replace the manual steps with nodes. The logic stays the same. The prompt stays the same. The Telegram API call stays the same. The only thing that changes is the orchestration layer that connects them without you typing commands manually.
What to Build Next
Once this manual pipeline works reliably, extend it in three directions.
Add more lead criteria. Expand your evaluation prompt to include industry type, geographic location, payment terms preference, and previous client relationship. More criteria produce more nuanced decisions and filter out more bad leads before they reach your sales team.
Automate the input. Connect a Typeform, Google Form, or website contact form to submit lead data automatically instead of pasting it manually. The form submission triggers the AI evaluation without any manual intervention.
Add decision routing. Instead of sending every decision to the same Telegram message, route good leads to a CRM creation step and bad leads to a polite auto-rejection email. This turns a notification system into a complete lead management pipeline.
The foundation you built here structured input, AI evaluation, action output scales to handle hundreds of leads per day with the right orchestration layer on top.
Conclusion
Building a Lead Qualification Bot with Nanobot and Telegram is one of the easiest ways to understand how real AI workflows operate. Instead of using AI only for writing, this project teaches you how AI can evaluate information, make decisions, and trigger actions automatically. By combining Nanobot’s reasoning capabilities with Telegram notifications, beginners can create a practical automation system that feels close to real-world AI operations used in businesses today. Once this workflow is working, you can expand it further using forms, CRMs, Google Sheets, or n8n integrations.Get scalable KVM VPS hosting from Ucartz and keep your AI bots online anytime.
FAQ
Why use Nanobot for lead qualification?
Nanobot is useful for beginner AI automation experiments because it can process prompts, apply reasoning, and generate structured decisions without requiring complex setup.
Do I need coding knowledge to build this project?
No. This beginner workflow mainly uses prompts, Telegram Bot setup, and simple terminal commands. It is designed for people starting with AI automation.
What can I automate after this project?
After building this workflow, you can expand into:
- CRM automation
- AI customer support
- Proposal generation
- AI sales assistants
- n8n workflows
- Google Sheets integrations
- Email automation
Can this workflow be used for real businesses?
Yes. Many businesses use similar workflows to filter leads, prioritize support tickets, and automate repetitive decisions before involving human teams.