Setting up the DNS for a DirectAdmin web server
Here, we will be using domain.com as our domain name and 105.94.126.28 & 105.94.126.29 for our IP addresses. You will need to replace all three with your own.
1) Login to your DirectAdmin control panel and click on “IP management.” You should see the first server IP address already in the list. Enter the second IP addresses one beneath it.
2) After entering the IP addresses, go to “User level” and click on “DNS Management.” Enter the DNS records you need for your domain name/host. Most people use the naming convention ns1.domain.com. and ns2.domain.com. for the two nameserver entries – make sure you include the trailing dot.
3) Now we’ll set up the glue record. Using the same name you used in step 2 and the IP addresses you used in step 1, now you’ll need to set up the DNS and name servers for your server with your domain registrar. You’ll need to configure the domain with your “global” DNS (domain) provider as follows (use the two IP addresses you configured within DirectAdmin):
ns1.domain.com -> 105.94.126.28
ns2.domain.com -> 105.94.126.29
As with any DNS change, these server entries may take 24-48 hours to populate to the Internet.
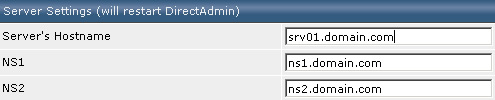
4) Log back into DirectAdmin and click “Administrator Settings.” Enter a server name with the field “Server’s Hostname” You can use any letter (a-z), 0-9 and hyphens. I like to use something simple like srv01. Enter the names you used in steps 2 and 3 to fill in the fields for NS1 and NS2.
5) Connect to your server via SSH (use Putty) and log in as root (sudo) and enter:
nano /etc/hosts
Hopefully, your distro includes the text editor Nano. If not, you might want to use Pico or the more adventurous Vi (check the Linux MAN pages on how to insert text with the editor VI if you need a bit of a refresher). Add the following line to the file:
105.94.126.28 srv01.domain.com srv01
Save the file via ctrl+x (confirm to save the file) or: wq if you were forced to edit the file with Vi.
The alternative way to handle your server’s DNS
The main reason why people host their DNS on their own server is that it’s easy. The local DNS Zone is automatically created by the control panel. And, after the virtual host on your server with DA installed is created, you’ll only need to change the name server entries for the specific domain name(s).
There are also reasons to use a DNS zone for your domain names from your domain name provider or a professional DNS provider.
- If your VPS or dedicated server is down, all DNS is down too. If you use, for example, Google Apps for your email, you will be able to receive email only for a short time before it goes down too.
- If you move your website to a different server you need to change the nameservers for your domain name too. For several TLD’s does this change take hours.
- A professional DNS provider resolves often much faster than your own server.
- Most providers have a large staff and can more quickly respond to DDOS and other attacks.
There is additional work you’ll need to do to create a DNS zone for each website on your server (local DNS) and the public DNS via the DNS account from your domain name provider. Most service providers are able to provide DNS templates, which make the work much easier and faster. A DNS zone is often a free service from your domain provider. If not or if you like to use additional features like virtual DNS, a web application firewall and a CDN for your static files, try Cloudflare.


