We will store the backups in a network share mounted in the backup directory so that in the event of a system-wide crash, you will still be covered.
Installing MySQL / MariaDB / PostgreSQL Databases
1. This guide assumes you must have MySQL / MariaDB / PostgreSQL instance running, If not, please install the following packages:
Fedora-based distributions:
yum update && yum install mariadb mariadb-server mariadb-libs postgresql postgresql-server postgresql-libs
Debian and derivatives:
# aptitude update && aptitude install mariadb-client mariadb-server mariadb-common postgresql-client postgresql postgresql-common
2. You have a testing MySQL / MariaDB / PostgreSQL database that you can use (you are advised to NOT use either automysqlbackup or autopostgresqlbackup in a production environment until you have become acquainted with these tools).
Otherwise, create two sample databases and populate them with data before proceeding. In this article I will use the following databases and tables:
CREATE DATABASE mariadb_db;
CREATE TABLE rootadminz_tbl (UserID INT AUTO_INCREMENT PRIMARY KEY,
UserName VARCHAR(50),
IsActive BOOL);
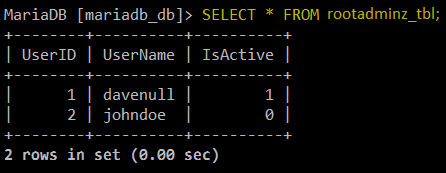
Create MySQL Database
CREATE DATABASE postgresql_db;
CREATE TABLE rootadminz_tbl (
UserID SERIAL PRIMARY KEY,
UserName VARCHAR(50),
IsActive BOOLEAN);
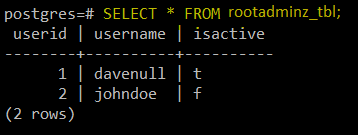
Create PostgreSQL Database
Installing automysqlbackup and autopgsqlbackup in CentOS 7 and Debian 8
3. In Debian 8, both tools are available in the repositories, so installing them is as simple as running:
# aptitude install automysqlbackup autopostgresqlbackup
Whereas in CentOS 7 you will need to download the installation scripts and run them. In the sections below we will focus exclusively on installing, configuring, and testing these tools on CentOS 7 since for Debian 8 – where they almost work out of the box, we will make the necessary clarifications later in this article.
Installing and configuring automysqlbackup in CentOS 7
4. Let us begin by creating a working directory inside /opt to download the installation script and run it:
# mkdir /opt/automysqlbackup
# cd /opt/automysqlbackup
# wget http://ufpr.dl.sourceforge.net/project/automysqlbackup/AutoMySQLBackup/AutoMySQLBackup%20VER%203.0/automysqlbackup-v3.0_rc6.tar.gz
# tar zxf automysqlbackup-v3.0_rc6.tar.gz
# ./install.sh

The configuration file for automysqlbackup is located inside /etc/automysqlbackup under the name myserver.conf. Let’s take a look at most relevant configuration directives:
myserver.conf – Configure Automysqlbackup
# Username to access the MySQL server
CONFIG_mysql_dump_username='root'
# Password
CONFIG_mysql_dump_password='YourPasswordHere'
# Host name (or IP address) of MySQL server
CONFIG_mysql_dump_host='localhost'
# Backup directory
CONFIG_backup_dir='/var/backup/db/automysqlbackup'
# List of databases for Daily/Weekly Backup e.g. ( 'DB1' 'DB2' 'DB3' ... )
# set to (), i.e. empty, if you want to backup all databases
CONFIG_db_names=(AddYourDatabase Names Here)
# List of databases for Monthly Backups.
# set to (), i.e. empty, if you want to backup all databases
CONFIG_db_month_names=(AddYourDatabase Names Here)
# Which day do you want monthly backups? (01 to 31)
# If the chosen day is greater than the last day of the month, it will be done
# on the last day of the month.
# Set to 0 to disable monthly backups.
CONFIG_do_monthly="01"
# Which day do you want weekly backups? (1 to 7 where 1 is Monday)
# Set to 0 to disable weekly backups.
CONFIG_do_weekly="5"
# Set rotation of daily backups. VALUE*24hours
# If you want to keep only today's backups, you could choose 1, i.e. everything older than 24hours will be removed.
CONFIG_rotation_daily=6
# Set rotation for weekly backups. VALUE*24hours. A value of 35 means 5 weeks.
CONFIG_rotation_weekly=35
# Set rotation for monthly backups. VALUE*24hours. A value of 150 means 5 months.
CONFIG_rotation_monthly=150
# Include CREATE DATABASE statement in backup?
CONFIG_mysql_dump_create_database='no'
# Separate backup directory and file for each DB? (yes or no)
CONFIG_mysql_dump_use_separate_dirs='yes'
# Choose Compression type. (gzip or bzip2)
CONFIG_mysql_dump_compression='gzip'
# What would you like to be mailed to you?
# - log   : send only log file
# - files : send log file and sql files as attachments (see docs)
# - stdout : will simply output the log to the screen if run manually.
# - quiet : Only send logs if an error occurs to the MAILADDR.
CONFIG_mailcontent='quiet'
# Email Address to send mail to? (user@domain.com)
CONFIG_mail_address='root'
# Do you wish to encrypt your backups using openssl?
#CONFIG_encrypt='no'
# Choose a password to encrypt the backups.
#CONFIG_encrypt_password='password0123'
# Command to run before backups (uncomment to use)
#CONFIG_prebackup="/etc/mysql-backup-pre"
# Command run after backups (uncomment to use)
#CONFIG_postbackup="/etc/mysql-backup-post"
Once you have configured automysqlbackup as per your needs, you are strongly advised to check out the README file found in /etc/automysqlbackup/README.
MySQL Database Backup
6. When you’re ready, go ahead and run the program, passing the configuration file as the argument:
# automysqlbackup /etc/automysqlbackup/myserver.conf
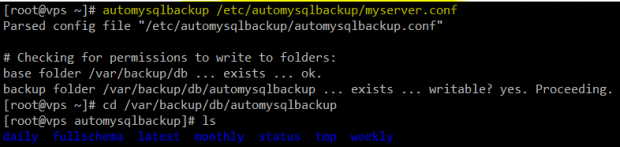
Configure Automysqlbackup on CentOS 7
A quick inspection of the daily directory will show that automysqlbackup has run successfully:
# pwd
# ls -lR daily
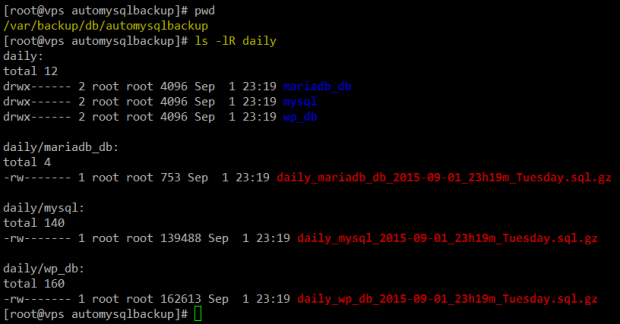
MySQL Daily Database Backup
Of course, you can add a crontab entry to run automysqlbackup at a time of day that best suits your needs (1:30am every day in the below example):
30 01 * * * /usr/local/bin/automysqlbackup /etc/automysqlbackup/myserver.conf
Restoring a MySQL Backup
7. Now let’s drop the mariadb_db database on purpose:
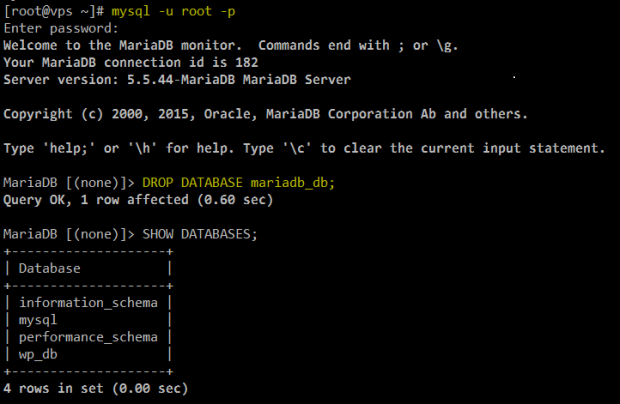
Drop MariaDB Database
Let’s create it again and restore the backup. In the MariaDB prompt, type:
CREATE DATABASE mariadb_db;
exit
Then locate:
# cd /var/backup/db/automysqlbackup/daily/mariadb_db
# ls

Locate MariaDB Database backup
And restore the backup:
# mysql -u root -p mariadb_db < daily_mariadb_db_2015-09-01_23h19m_Tuesday.sql
# mysql -u root -p
MariaDB [(none)]> USE mariadb_db;
MariaDB [(none)]> SELECT * FROM rootadminz_tb1;

Restore MariaDB Backup
Installing and configuring autopostgresqlbackup in CentOS 7
8. In order for autopostgresql to work flawlessly in CentOS 7, we will need to install some dependencies first:
# yum install mutt sendmail
Then let's repeat the process as before:
# mkdir /opt/autopostgresqlbackup
# cd /opt/autopostgresqlbackup
# wget http://ufpr.dl.sourceforge.net/project/autopgsqlbackup/AutoPostgreSQLBackup/AutoPostgreSQLBackup-1.0/autopostgresqlbackup.sh.1.0
# mv autopostgresqlbackup.sh.1.0 /opt/autopostgresqlbackup/autopostgresqlbackup.sh
Let's make the script executable and start/enable the service:
# chmod 755 autopostgresqlbackup.sh
# systemctl start postgresql
# systemctl enable postgresql
Finally, we will edit the value of the backup directory setting to:
BACKUPDIR="/var/backup/db/autopostgresqlbackup"
After having through the configuration file of automysqlbackup, configuring this tool is very easy (that part of the task is left up to you).
9. In CentOS 7, as opposed to Debian 8, autopostgresqlbackup is best run as the postgres system user, so in order to do that you should either switch to that account or add a cron job to its crontab file:
# crontab -u postgres -e
30 01 * * * /opt/autopostgresqlbackup/autopostgresqlbackup.sh
The backup directory, by the way, needs to be created and its permissions and group ownership must be set recursively to 0770 and postgres (again, this will NOT be necessary for Debian):
# mkdir /var/backup/db/autopostgresqlbackup
# chmod -R 0770 /var/backup/db/autopostgresqlbackup
# chgrp -R postgres /var/backup/db/autopostgresqlbackup
The result:
# cd /var/backup/db/autopostgresqlbackup
# pwd
# ls -lR daily
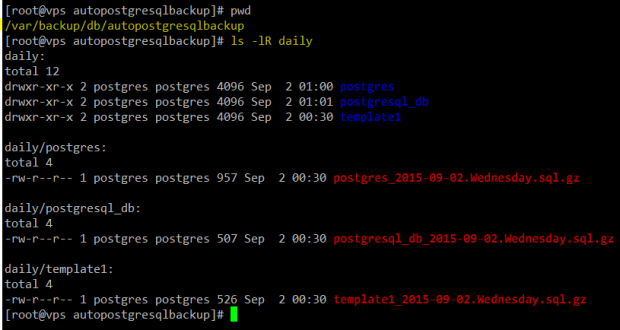
PostgreSQL Daily Database Backup
10. Now you can restore the files when needed (remember to do this as user postgres after recreating the empty database):
# gunzip -c postgresql_db_2015-09-02.Wednesday.sql.gz | psql postgresql_db
Considerations in Debian 8
As we mentioned earlier, not only the installation of these tools in Debian is more straightforward, but also their respective configurations. You will find the configuration files in:
- Automysqlbackup: /etc/default/automysqlbackup
- Autopostgresqlbackup: /etc/default/autopostgresqlbackup


