


The dig command in Linux and Unix is a powerful utility used for DNS (Domain Name System) lookups. It allows you to query DNS servers and view detailed responses, making dig command an essential tool for diagnosing and troubleshooting network or website issues. Whether it’s resolving domain names, identifying incorrect IPv4/IPv6 addresses, checking DNS propagation, or verifying name server records, dig command provides the answers you need. Because of its reliability and flexibility, system administrators, developers, and webmasters rely on dig to keep websites and services running smoothly.
In this guide, we’ll explore how to use the dig command to find IP addresses, DNS records, and much more directly from the terminal.
Why Use the dig Command?
The dig command in Linux and Unix is mainly used to query DNS servers. It is primarily used tool for network troubleshooting because of its flexibility, simplicity to use, and clear output. The Linux and Unix dig command is widely preferred because:
- The dig command provides detailed DNS responses.
- It’s simple yet versatile for various DNS queries.
- It allows you to test name resolution, troubleshoot network errors, and gather record-specific details.
Whether you’re checking if your website resolves correctly, verifying MX records for emails, or debugging DNS latency, dig command is a go-to utility
Basic Syntax of the dig Command in Linux and Unix
The dig command follows a simple structure. You can query domains, hostnames, or even specify a particular DNS server. The general syntax is:
dig [options] [domain] [record type]
Common Usage of the dig command:
dig hostname
dig domainname.com
dig @dns-server-name hostname
dig @dns-server-name IPAddress
dig @dns-server-name hostname|IPAddress record-type
Explanation:
- hostname / domainname.com → The domain or host you want to query
- @dns-server-name → The specific DNS server to query (e.g., @8.8.8.8 for Google DNS)
- IPAddress → Perform lookups directly using an IP address
- record-type → The DNS record type you want to fetch (e.g., A, MX, NS, TXT)
DNS Record Types for the dig Command in Linux and Unix
The following is the list of common DNS record types for the dig Command:
| Record Type | Purpose | Example Command |
| A | Maps a domain to an IPv4 address | dig example.com A |
| AAAA | Maps a domain to an IPv6 address | dig example.com AAAA |
| CNAME | Points a domain to another domain (alias) | dig example.com CNAME |
| MX | Lists mail servers for email delivery | dig example.com MX |
| NS | Shows authoritative name servers | dig example.com NS |
| PTR | Reverse DNS lookup (IP → domain) | dig -x 93.184.216.34 |
| SOA | Provides DNS zone info (primary server, admin contact) | dig example.com SOA |
| TXT | Stores text data (SPF, DKIM, verification) | dig example.com TXT |
| SRV | Defines servers for specific services (SIP, XMPP) | dig example.com SRV |
| CAA | Specifies allowed SSL/TLS certificate authorities | dig example.com CAA |
| ANY | Fetches all available DNS records | dig example.com ANY |
| NAPTR | Supports advanced apps like VoIP and ENUM | dig example.com NAPTR |
| DS | Delegation Signer (used in DNSSEC) | dig example.com DS |
| DNSKEY | Stores DNSSEC public keys | dig example.com DNSKEY |
| RRSIG | Contains cryptographic signatures for DNSSEC | dig example.com RRSIG |
| TLSA | Used in DANE for TLS certificate validation | dig example.com TLSA |
Common dig Command Examples
Open your terminal and find the IP address of the host www.ucartz.in using dig, type:
Basic DNS Lookup
To get the A record (IPv4 address) of a domain, you can use the following commands:
dig www.ucartz.in A
Sample Output:[root@server345 ~]# dig ucartz.in
; <<>> DiG 9.11.36-RedHat-9.11.36-16.el8_10.4 <<>> ucartz.in
;; global options: +cmd
;; Got answer:
;; ->>HEADER<<- opcode: QUERY, status: NOERROR, id: 57963
;; flags: qr rd ra; QUERY: 1, ANSWER: 1, AUTHORITY: 0, ADDITIONAL: 1
;; OPT PSEUDOSECTION:
; EDNS: version: 0, flags:; udp: 512
;; QUESTION SECTION:
;ucartz.in. IN A
;; ANSWER SECTION:
ucartz.in. 21600 IN A 104.254.130.218
;; Query time: 56 msec
;; SERVER: 8.8.8.8#53(8.8.8.8)
;; WHEN: Fri Oct 03 14:21:02 EDT 2025
;; MSG SIZE rcvd: 54
[root@server345 ~]#
This will display the IP address associated with the domain.
Query a Specific Record Type
To check for a MX record (mail servers for email delivery):
dig ucartz.in MX
dig +short ucartz.in MX

Query a TXT of a domain name
A TXT record is used for SPF, DKIM, or verification. To get text (TXT) DNS records of google.com, run any of the following:
dig google.com TXT
dig +short google.com TXT
dig @8.8.8.8 google.com TXT
Sample Output:
;google.com                     IN      TXT
;; ANSWER SECTION:
google.com.             3600    IN      TXT     "MS=E4A68B9AB2BB9670BCE15412F629                                 16164C0B20BB"
google.com.             3600    IN      TXT     "google-site-verification=TV9-DB                                 e4R80X4v0M4U_bd_J9cpOJM0nikft0jAgjmsQ"
google.com.             3600    IN      TXT     "docusign=1b0a6754-49b1-4db5-854                                 0-d2c12664b289"
google.com.             3600    IN      TXT     "google-site-verification=wD8N7i                                 1JTNTkezJ49swvWW48f8_9xveREV4oB-0Hf5o"
google.com.             3600    IN      TXT     "google-site-verification=4ibFUg
Query the IP Address (A) of a Hostname
The output of dig can be verbose. Use the +short option to simplify results:
dig ucartz.in A +short
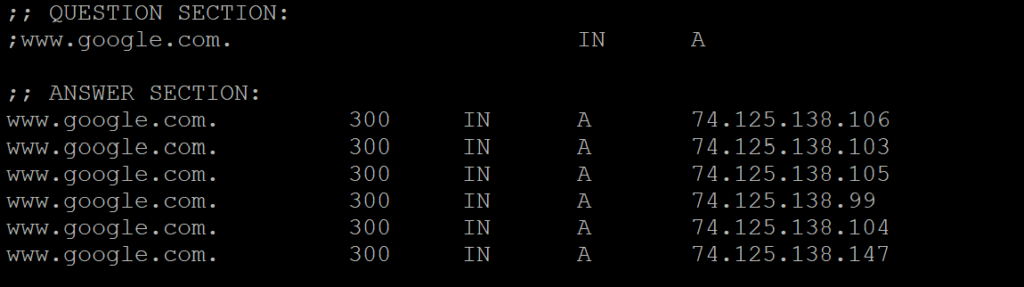
This shows just the IP address, making it easier to script or automate checks.
Query the hostname of an IP address
Run:dig 74.125.138.99

Query a different Nameservers (NS Records)
The syntax for the dig command is as follows to change the name server:
dig @<nameserver> <hostname>
dig @ns1.ucartz.in IPaddress
dig @ns1.yahoo.com yahoo.com
To verify authoritative name servers:
dig ucartz.in NS
Sample Output:
domains-ucartz.arth.dns.com
domains-ucartz.ars.dns.com
domains-ucartz.rcury.dns.com
domains-ucartz.num.dns.com
Query the Reverse DNS Lookup
To perform a reverse DNS lookup (mapping an IP address to its domain name), use the -x option with the dig command as shown below:
dig -x <ip-address>
dig @<name-server> -x <ip-address>
dig -x 198.245.61.161
dig +short -x 198.245.61.161
The reverse DNS lookup for 198.245.61.161 resolves to the following domain:
www.centova47.instainternet.com
Query the SOA records for DNS zone name
To view the SOA (Start of Authority) records for a DNS zone, you can use the dig command. Here’s the syntax and examples:
dig <zone-name> SOA
dig ucartz.in SOA
dig @<dns-server> <zone-name> SOA
dig @8.8.8.8 ucartz.in SOA
These commands will display the primary authoritative DNS server, the responsible party, and other SOA parameters for the specified domain.
Query DNS using ANY
To retrieve as much DNS information as possible for a domain, you can use an ANY query with the dig command. This requests all available DNS record types for the domain. Examples:
dig <domain> ANY
dig ucartz.in ANY
dig +short <domain> ANY
dig +short ucartz.in ANY
dig @<dns-server> <domain> ANY
dig @8.8.8.8 ucartz.in ANY
These commands attempt to fetch all DNS records – such as A, MX, TXT, NS, and SOA – for the specified domain.
Trace the DNS Path
The +trace option shows the DNS resolution path from the root servers:
dig ucartz.in +trace
Query a Specific DNS Server
By default, dig queries your system’s configured DNS. You can specify another DNS server:
dig @8.8.8.8 google.com
This queries Google’s public DNS (8.8.8.8) instead of your local resolver.
Measure DNS Query Time
dig provides statistics at the bottom of its output. You can focus on query time with:
dig ucartz.in | grep "Query time"
Getting Long or Short Answers Using dig
With the dig command, you can control whether the output is short or detailed:
Short Answer: Use the +short option for concise output:
dig +short <query>
dig +short ucartz.in NS
dig @8.8.8.8 +short ucartz.in NS
Long / Detailed Answer: By default, dig provides a full answer. You can fine-tune it for readability using:
dig +multiline +noall +answer +nocmd ucartz.in ANY
This produces a structured, useful output about the domain.
Batch Mode: Query Multiple Hosts from a File
Create a text file with the queries you want, one per line:
cat > lookup.txt
+short yahoo.com MX
+short google.com MX
+short ucartz.in MX
Run dig in batch mode using the -f option:
dig -f /path/to/lookup.txt
dig -f lookup.txt
Debug Tip: Trace the DNS Path
To follow the DNS delegation path from the root servers, use the +trace option:
dig +trace ucartz.in
dig +short +trace ucartz.in
dig +short +trace s0.ucartz.in
Finding TTL (Time to Live) Values
TTL indicates how long DNS records are cached by recursive DNS servers. To view the TTL for a record:
dig +nocmd +noall +answer +ttlid A ucartz.in
dig +nocmd +noall +answer +ttlid A www.ucartz.in
Setting IPv4 or IPv6 Query Transport
- Force IPv4 queries:
dig -4 <query>
- Force IPv6 queries:
dig -6 <query>
dig Command Options
The dig command provides a wide range of options to perform and customise DNS queries on Linux or Unix-like systems. Here is the summary of options
Command-line Options
| Option | Usage |
| -x <dot-notation> | Shortcut for reverse lookups |
| -i | Use IP6.INT for IPv6 reverse lookups |
| -f <filename> | Batch mode (read queries from a file) |
| -b <address[#port]> | Bind to a source address/port |
| -p <port> | Specify a port number |
| -q <name> | Specify query name |
| -t <type> | Specify query type (A, MX, TXT, etc.) |
| -c <class> | Specify query class (IN, CH, HS, etc.) |
| -k <keyfile> | Specify TSIG key file |
| -y [hmac:]name:key | Specify named base64 TSIG key |
| -4 | Force IPv4 query transport only |
| -6 | Force IPv6 query transport only |
| -m | Enable memory usage debugging |
Linux dig command query options
The dig command supports numerous query options, each identified by a keyword prefixed with a plus sign (+). Some keywords enable or disable specific features, and can be negated by adding no before the keyword. Other keywords assign values to configurable settings, such as the timeout interval, using the format +keyword=value. Common query options include:
| Option | Usage |
| +[no]vc | Enable or disable TCP mode |
| +[no]tcp | Alternate syntax for TCP mode |
| +time=### | Set query timeout in seconds (default 5) |
| +tries=### | Set number of UDP attempts (default 3) |
| +retry=### | Set number of UDP retries (default 2) |
| +domain=### | Set default domain name |
| +bufsize=### | Set EDNS0 max UDP packet size |
| +ndots=### | Set NDOTS value for search list |
| +edns=### | Set EDNS version |
| +[no]search | Enable or disable search list usage |
| +[no]showsearch | Display intermediate search results |
| +[no]defname | Apply default domain name |
| +[no]recurse | Enable or disable recursive mode |
| +[no]ignore | Don’t revert to TCP for truncated responses |
| +[no]fail | Don’t try next server on SERVFAIL |
| +[no]besteffort | Attempt parsing even illegal messages |
| +[no]aaonly | Set AA flag in query |
| +[no]adflag | Set AD flag in query |
| +[no]cdflag | Set CD flag in query |
| +[no]cl | Display class in records |
| +[no]cmd | Display command line in output |
| +[no]comments | Display comment lines |
| +[no]question | Display the question section |
| +[no]answer | Display the answer section |
| +[no]authority | Display authority section |
| +[no]additional | Display additional section |
| +[no]stats | Display statistics |
| +[no]short | Output only short form of answer |
| +[no]ttlid | Display TTL values in records |
| +[no]all | Set or clear all display flags |
| +[no]qr | Print question before sending |
| +[no]nssearch | Search all authoritative name servers |
| +[no]identify | Identify responders in short answers |
| +[no]trace | Trace delegation path from root |
| +[no]dnssec | Request DNSSEC records |
| +[no]nsid | Request Name Server ID |
| +[no]multiline | Print records in expanded format |
| +[no]onesoa | AXFR prints only one SOA record |
Conclude:
In summary, the dig command is a powerful and flexible tool for performing DNS queries. By using its various command-line and query options, you can customise lookups, retrieve detailed or concise information, perform batch queries, trace DNS paths, check TTL values, and even target specific nameservers. Mastering these options allows for precise, efficient, and insightful DNS diagnostics and administration.


