
Switching from Centova Cast AutoDJ to live broadcasting is straightforward once your streaming software is connected to the correct live source. Centova Cast allows internet radio stations to run AutoDJ for automated music playback and hand the broadcast over to a live DJ using software such as BUTT, Mixxx, RadioBOSS, or VirtualDJ.
In this guide, you’ll learn how to switch from AutoDJ to live broadcasting in Centova Cast radio hosting from your laptop, what equipment and software you need, how to configure SHOUTcast live source settings, which port and DJ credentials to use, and how to troubleshoot common errors such as “Invalid password” and unsupported audio sample rates.
You’ll also learn what happens when you disconnect your live broadcasting software and how AutoDJ can resume after your live show.This guide is written for beginners who want to broadcast live from a Windows laptop while using Centova Cast AutoDJ.
How Live Broadcasting Actually Works With Centova Cast
Centova Cast is the control panel you use to manage your internet radio station. It is not the thing that actually transmits your audio. That job belongs to a separate streaming server technology, and in this setup, that technology is SHOUTcast v1.
The basic signal path looks like this:
Microphone → Broadcasting Software → SHOUTcast Server → ListenersCentova Cast’s job is to give you the connection details your broadcasting software needs to reach that SHOUTcast server. In the configuration used for this guide, those details looked like this:
Protocol:            SHOUTcast v1
Server hostname:      centova11.instainternet.com
Live port (AutoDJ on): 8185
Bitrate:              64 Kbps
Format:               MP3
Authentication:       DJ username and password
This distinction matters. Centova Cast is the management panel. SHOUTcast is the streaming server technology actually handling your audio connection. Confusing the two is where a lot of the early setup confusion comes from.
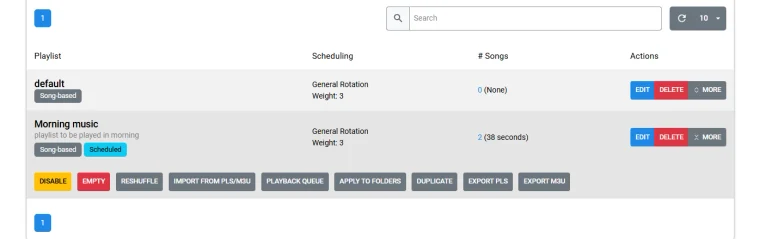
Before going live, make sure your AutoDJ is properly configured with your music and playlists. If you need help, see our guide on creating an AutoDJ playlist in Centova Cast.
What You Need to Broadcast Live From a Laptop
You do not need a dedicated radio studio. A basic live show setup requires five things.
A laptop or computer. This runs your broadcasting software and manages the connection to your streaming server.
A microphone. Your laptop’s built-in microphone works to get started. A USB microphone improves audio quality noticeably if you plan to do this regularly.
Headphones. These prevent your microphone from picking up audio from your speakers, which causes echo for your listeners.
Stable internet. Your connection needs to hold steady for the duration of your broadcast.
Broadcasting software. This is the application that captures your microphone input and sends it to your streaming server. For this guide, BUTT (Broadcast Using This Tool) is the software used, because it is simple and free for beginners. Other options include Mixxx, RadioBOSS, SAM Broadcaster, and VirtualDJ. You only need one.
Step 1: Log In to Centova Cast and Find Your Live Source Info
Log in to your Centova Cast account. You do not need a separate SHOUTcast account just because your station runs on SHOUTcast streaming software. All the connection information you need already lives inside your Centova Cast panel.
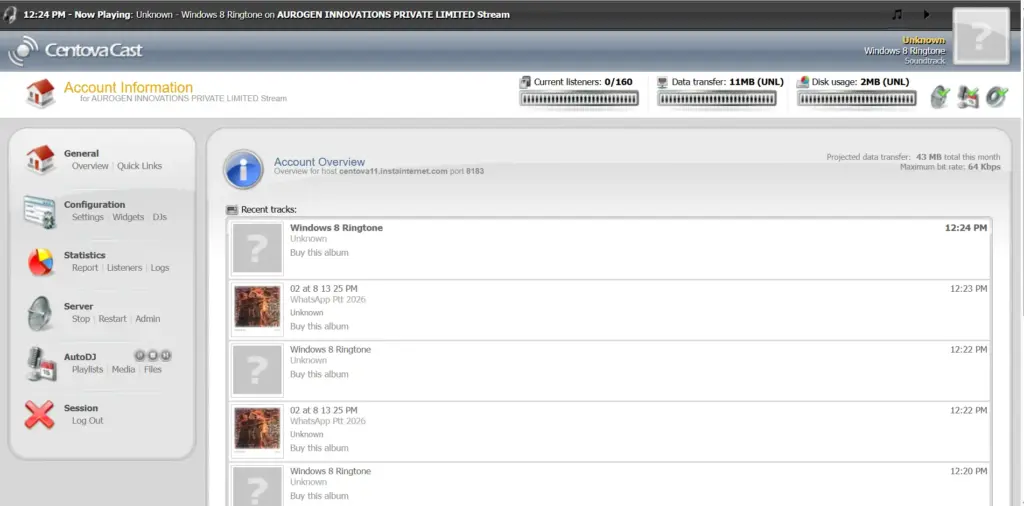
Navigate to Quick Links. Here you should find several pieces of information:
Stream start page
Streaming server index page
Tune-in links
Live Source Connections
The Live Source Connections section is the one that matters most for this guide. It tells you exactly how your broadcasting software should connect to your station.
Step 2: Understand the Two Live Connection Options
This is the part of the setup where beginners most commonly go wrong, so pay close attention here.
Centova Cast typically shows two different connection configurations, and picking the wrong one is a common source of failed connections.
When AutoDJ is running:
Protocol: SHOUTcast v1
Server:   centova11.instainternet.com
Port:     8185
Bitrate:  64 Kbps
The password format for this connection is your DJ account’s username and password, separated by a colon:
dj1:yourpasswordThis is the connection you use for the exact workflow this guide covers: broadcasting live while AutoDJ is currently active and needs to hand off control to you.
When AutoDJ is not running:
Protocol: SHOUTcast v1
Server:   centova11.instainternet.com
Port:     8183
Format:   MP3
This connection uses your stream’s source password instead of DJ account credentials.
For the AutoDJ-to-live-and-back workflow described in this guide, do not default to port 8183. If your Centova Cast panel specifically labels a port for use “while AutoDJ is running,” that is the one to use, in this case 8185. Using the wrong port here is one of the most common reasons a connection either fails outright or technically connects but does not properly take over from AutoDJ.
Step 3: Create or Verify Your DJ Account
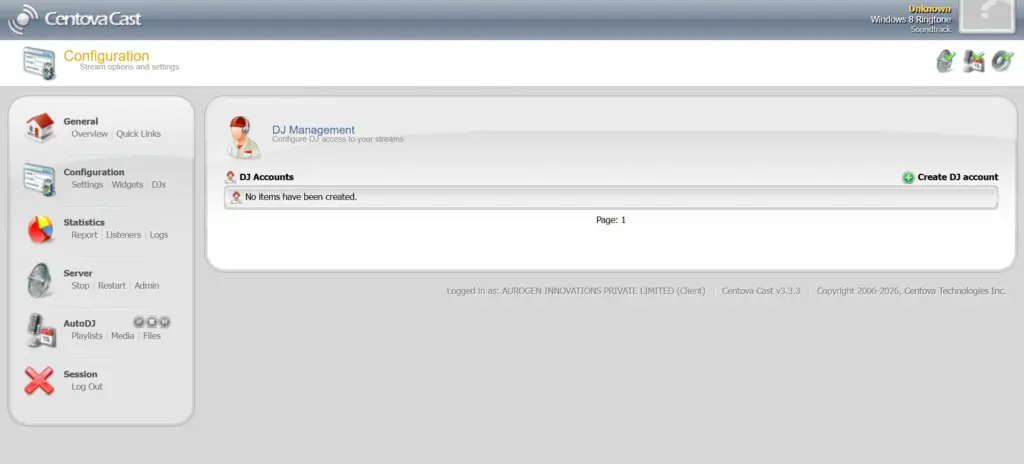
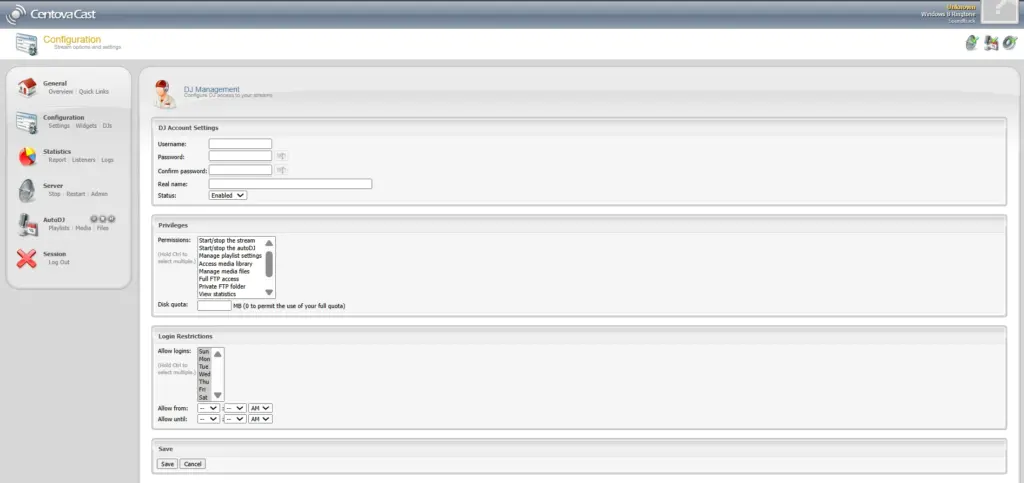
One of the most common errors in this entire setup is an Invalid Password error, and the root cause is easy to miss if you are not paying attention to the credential format.
Centova Cast does not ask for just your DJ password on its own. It requires:
DJ username + colon + DJ passwordFor example:
john:password123Before opening your broadcasting software, go into your Centova Cast configuration and locate your DJ account details. You need both the DJ username and the DJ password.
This is a separate credential set from your main Centova Cast dashboard login. Your Centova Cast account login gets you into the management panel. Your DJ streaming credentials are what your broadcasting software uses to authenticate with the actual streaming server. Confusing these two is the single most common cause of authentication failures in this entire process.
Step 4: Install BUTT
Download and install BUTT (Broadcast Using This Tool) on your laptop. After installation, open it.
On first launch, BUTT typically shows information about the application version and detects your available audio input devices. In the test setup for this guide, BUTT detected:
Microphone Array (2- Intel® Smart Sound Technology for Digital Microphones)This confirmed the laptop’s built-in microphone was available and recognized by the application.
Step 5: Configure Your Microphone
Before touching any server settings, confirm your microphone actually works inside BUTT.
Open the audio settings within BUTT. Select your microphone as the input device. Depending on your hardware, it may appear under names like:
Microphone Array
Microphone
USB Audio Device
USB Microphone
If you are using your laptop’s built-in microphone, select whichever entry corresponds to your laptop’s internal microphone array.
Speak into the microphone and watch the audio level meter. Try something like:
"This is a test of my internet radio station."If the meter responds to your voice, BUTT is correctly receiving your microphone input. If it does not move at all, the input device selection is likely wrong, or your system’s microphone permissions are blocking access.
A Common BUTT Warning: Sample rate Not Supported
During setup, BUTT may display a message like this:
Sample rate not supported: 44100Hz
Using default samplerate: 48000Hz
At first glance this looks like a failure. It is not. BUTT automatically fell back to 48000 Hz, a sample rate the server does support, and the connection was still able to proceed normally.
If you see a similar message, do not assume your entire setup has broken. The relevant question is not whether this particular warning appeared, but whether BUTT ultimately connects successfully to the streaming server and whether your microphone audio is being received. A sample rate fallback on its own does not block broadcasting.
Step 6: Configure the SHOUTcast Server in BUTT
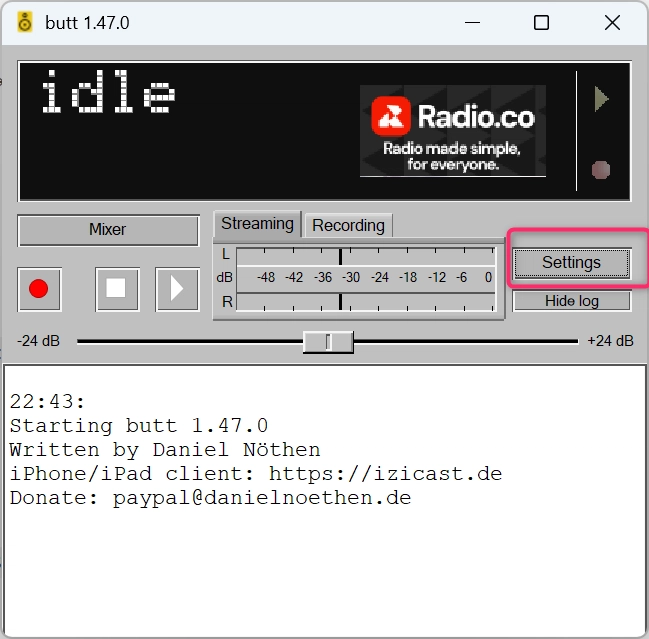
With your microphone confirmed working, configure the server connection.
Open BUTT, go to Settings, then Server. Add a new server entry using the details from your Centova Cast Live Source Connections page.
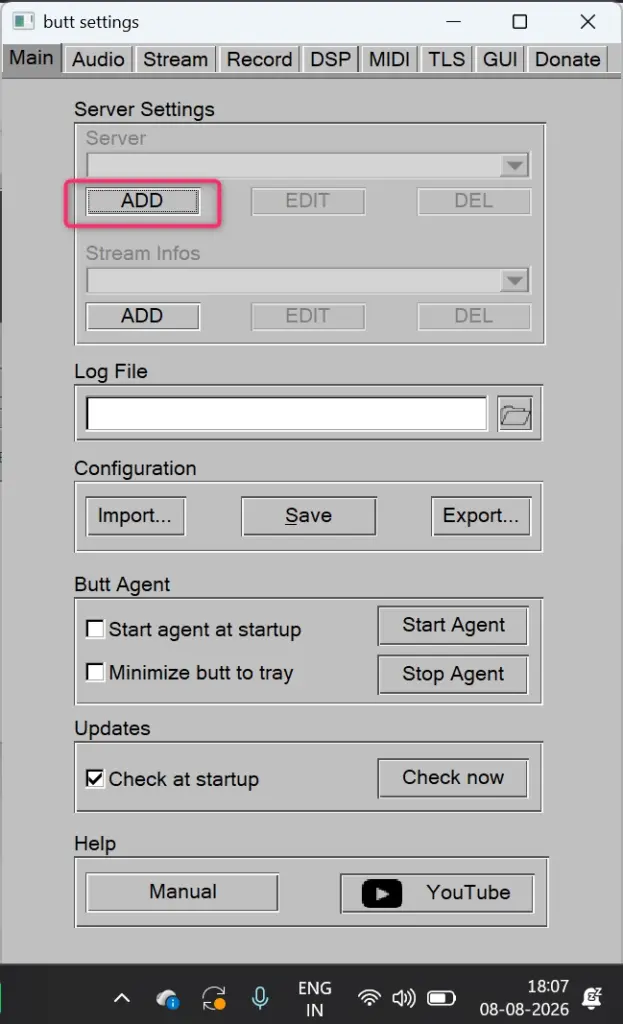
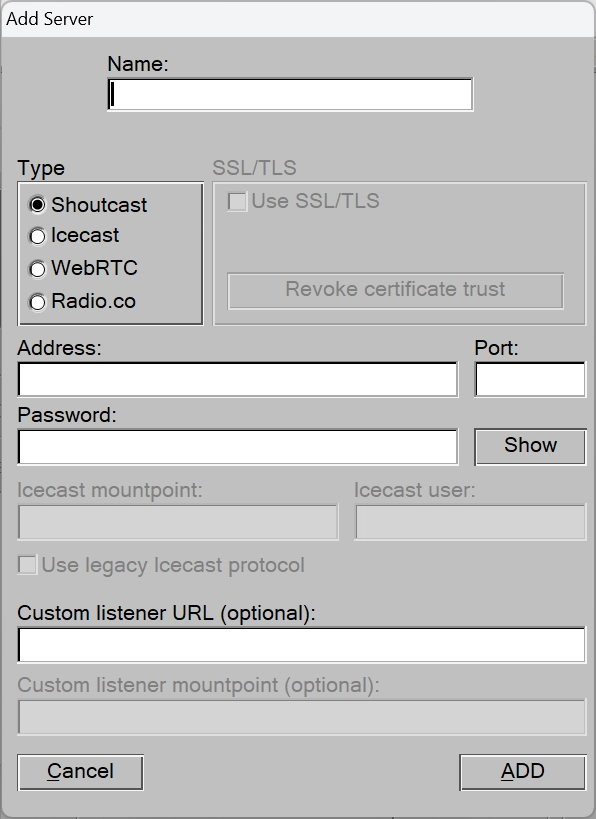
For the configuration used in this guide:
Server type: SHOUTcast
Server:      centova11.instainternet.com
Port:        8185
Bitrate:     64 Kbps
Format:      MP3
Password:    DJ_USERNAME:DJ_PASSWORD
For example:
dj1:examplepasswordDo not use this example as your actual password. Use your real DJ account credentials in this exact colon-separated format.
Step 7: The Invalid Password Error and How to Fix It
This was one of the actual problems encountered during setup testing, and it is worth walking through because it is a genuinely common mistake.
BUTT initially showed:
Connect: Invalid password!This error tells you something useful even though it looks like a dead end. The software successfully reached the server. The connection attempt itself worked. The problem was specifically with authentication, not with server address, port, or network connectivity.
The fix was correcting the credential format. Instead of entering just the password:
password123The correct format required the username and password together, separated by a colon:
username:password123After correcting the credentials to this format, the next connection attempt succeeded. If you hit this exact error, check your password field first before troubleshooting anything else. Nine times out of ten, this is a formatting issue rather than an actual wrong password.
Step 8: Confirm Connection Established
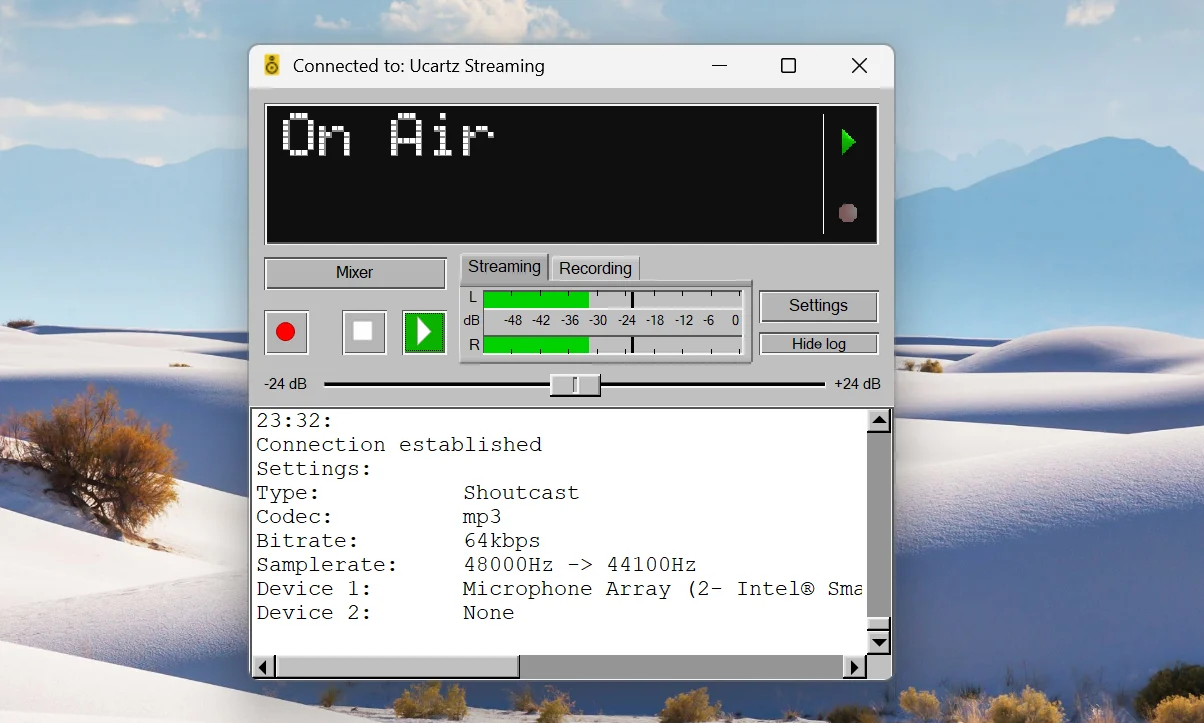
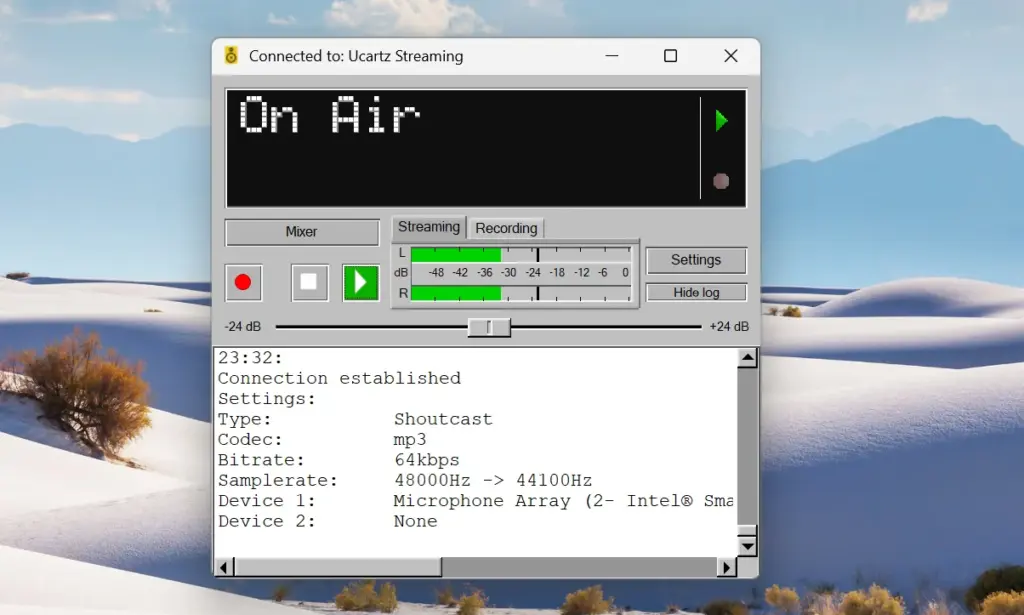
Once the credentials were corrected, BUTT displayed:
Connection establishedAlong with confirmation details:
Type:        SHOUTcast
Codec:       MP3
Bitrate:     64 kbps
Sample rate: 48000 Hz
Device 1:    Microphone Array
This is a meaningful milestone. It confirms your laptop’s broadcasting software successfully connected to the SHOUTcast server. Your signal path has now reached:
Microphone → BUTT → SHOUTcastBut do not stop here. A successful server connection does not automatically confirm what your actual listeners are hearing. You still need to verify the complete path through to a listener.
Step 9: Test Your Live Audio End to End
Keep BUTT connected. Speak into your microphone:
"Hello, this is a live test of my internet radio station."Watch the audio meter in BUTT. If it moves while you speak, your microphone input is being received correctly.
Now test from the listener side. Open your Centova Cast stream start page on a separate device, ideally your smartphone rather than the same laptop you are broadcasting from. Start playback on that device, then speak into your laptop microphone again.
Internet radio streaming introduces a natural delay between when you speak and when it reaches a listener. Do not expect your voice to appear instantly. Wait several seconds and listen carefully.
Why Testing on a Separate Device Matters
Hearing your voice through your laptop speakers is not sufficient proof that listeners can actually hear your live stream. Your laptop speakers may simply be playing BUTT’s local monitoring audio, which is a direct pass-through from your microphone rather than audio that traveled through the actual streaming path.
What actually matters is what comes through the real internet radio stream, which is why testing on a second device is essential. The complete verification path looks like this:
Laptop microphone
        ↓
     BUTT
        ↓
SHOUTcast server
        ↓
    Internet
        ↓
     Phone
        ↓
  Your voice
If you hear your voice on your phone after speaking into your laptop microphone, you have confirmed the complete live broadcasting path works end to end, not just the local software connection.
What If Centova Cast Still Shows the Old AutoDJ Track?
This can be confusing the first time it happens. You may connect BUTT successfully, see “Connection established,” and still see the previous AutoDJ track listed somewhere in the Centova Cast interface.
Do not immediately assume your live broadcast has failed based on this alone. The most reliable test is always what an actual listener hears through the stream, not what a status field in the dashboard displays.
Check your phone or secondary device stream. If it is playing your live microphone audio, your live source is working correctly, even if a particular dashboard field has not visually updated the way you expected. If your phone continues playing AutoDJ music instead of your voice, then the live source or mount point configuration genuinely needs investigation, and the dashboard discrepancy was an accurate warning sign rather than a cosmetic glitch.
What Happens to AutoDJ During Your Live Show
The full workflow this guide is building toward looks like this:
Before your show: AutoDJ plays your scheduled music normally, following whatever playlists and rotation you have configured.
At 7 PM: You connect BUTT using the live source connection details covered above.
During your show: Your microphone audio broadcasts live to your listeners, with AutoDJ stepping aside automatically.
After your show: You disconnect BUTT.
After disconnecting: AutoDJ resumes automatically, assuming your Centova Cast configuration is set up to allow that handoff behavior.
This means you do not need to manually rebuild or reconfigure your station every time you want to host a live show. The handoff between automated and live broadcasting happens through the connection and disconnection of your broadcasting software alone.
Troubleshooting Checklist
Work through these in order if your live broadcast is not behaving as expected.
Problem: Invalid password. Confirm you are using your DJ account credentials, not your main Centova Cast dashboard login. If your panel specifies the format as username and password separated by a colon, make sure you are entering exactly username:password, not just the password alone.
Problem: Samplerate not supported. If BUTT reports Samplerate not supported: 44100Hz followed by Using default samplerate: 48000Hz, this is not necessarily a failure. Check whether the server connection still succeeds despite this message before assuming something is broken.
Problem: BUTT connects but no microphone audio. Check that the correct microphone is selected in BUTT’s audio settings, that your operating system has granted microphone permission to BUTT, that your input volume is not muted or set to zero, and that your physical microphone connection (for USB mics) is secure. Speak and watch the audio meter directly to confirm.
Problem: BUTT says Connection established but listeners hear AutoDJ. Check the actual listener stream from a separate device first. If AutoDJ genuinely continues playing instead of your live audio, verify the server hostname, port, DJ credentials, and the exact live-source connection details provided by your Centova Cast panel. Do not start randomly changing ports hoping something works. Use the exact connection information your specific Centova Cast account provides, since these details can vary between hosting setups.
Final Setup Checklist Before Your First Live Show
Confirm you have each of these in place:
- Centova Cast login
- Active AutoDJ
- DJ account created
- DJ username and password on hand
- Laptop ready
- Microphone connected and tested
- Headphones (to prevent echo)
- Stable internet connection
- BUTT installed
- SHOUTcast v1 selected as server type
- Correct server hostname entered
- Correct live port entered (matching AutoDJ-active configuration)
- 6-4 Kbps bitrate configured
- MP3 format selected
- "Connection established" message confirmed
- Microphone audio meter responding
- Listener stream tested from a separate device
Once every item here checks out, you have the complete infrastructure needed to host a live internet radio show directly from your laptop.
FAQ
Do I need a different port every time I want to go live?
No. Once you identify the correct port for broadcasting while AutoDJ is running (in this setup, 8185), you use that same port every time. The two-port distinction exists because Centova Cast handles AutoDJ-active and AutoDJ-inactive live connections differently on the backend, not because the port changes session to session.
Why does Centova Cast ask for a username and password together instead of just a password?
This is how Centova Cast identifies which DJ account is connecting, since a single station can have multiple DJ accounts with different permissions. The colon-separated format (username:password) is simply how that combined credential gets passed to the SHOUTcast server during authentication.
Is my Centova Cast dashboard password the same as my DJ password?
No, and this is one of the most common points of confusion in this entire setup. Your Centova Cast login gets you into the management panel where you configure your station. Your DJ account credentials are a separate set of credentials specifically used by broadcasting software like BUTT to authenticate with the streaming server. Treat them as two entirely different logins.
Can I use Icecast instead of SHOUTcast if my Centova Cast panel specifies SHOUTcast?
No, not without reconfiguring your station’s server type at the hosting level first. Different Centova Cast installations are set up with different streaming server technologies. Whatever protocol your Live Source Connections page specifies is the one your setup is actually built around. Mixing configurations from a SHOUTcast-based tutorial into an Icecast-based station, or vice versa, will not work.
Conclusion
Switching from AutoDJ to live broadcasting in Centova Cast looks complicated the first time you encounter terms like server ports, DJ credentials, streaming protocols, sample rates, and broadcasting software all at once. The actual underlying workflow, once configured correctly, is straightforward.
AutoDJ handles your station automatically when you are not live. When it is time for your show, your laptop becomes the live audio source. Broadcasting software like BUTT connects your microphone to the SHOUTcast server using the exact live connection details your Centova Cast account provides.
Once this connection is confirmed working the first time, the ongoing process becomes simple: AutoDJ runs, you connect BUTT when you are ready to go live, your show broadcasts, you disconnect when finished, and AutoDJ resumes automatically. That gives you the flexibility to run scheduled automated programming throughout the day while still being able to step in and host live shows from your own laptop whenever you want.
Don’t let the technical setup slow down your broadcast. With Ucartz Radio Hosting, you can run your station with AutoDJ, manage playlists, and switch to live broadcasting when it’s time for your show.
Get reliable radio hosting with the infrastructure you need to keep your station streaming smoothly.
Start your online radio station with Ucartz today.